Have you noticed that email marketing platforms like getresponse, systeme.io, malchimp, mailgun, sendgrid etc don’t allow you to send bulk emails through their platforms or servers. Secondly, even when when you want to send normal transactional emails, cost piles up quickly as your contact increases. whether you want to send bulk emails or you want a more cost effective way to send unlimited marketing or transactional emails, setting up your own SMTP server will be a great great decision for you. There are different ways to setup and SMTP server, but here we are going to see how to setup postal SMTP server to help you send unlimited emails from your own server.
Before you go forward and for those who does not like doing alot of reading, I have recorded a Youtube video on how to setup postal SMTP server and you can check it out if you want.
If you love to have a comprehensive understanding of how to setup postal SMTP server I have a Udemy course, ‘Email Marketing: Build Own SMTP and Send Unlimited Emails’, where you can learn every detail on how to build a cold email outreach system with postal SMTP server and understand technical email marketing.
What Is Postal SMTP Server?
In the world of digital communication, an SMTP (Simple Mail Transfer Protocol) server is the engine that actually delivers your emails to the recipient’s inbox. Postal is a specialized, high-performance mail delivery platform designed to give you total control over this process without the high costs of commercial providers.
Simply put, SMTP server or Postal SMTP server is that technical detail that helps you to send emails to your customers anytime you click on SEND in your email marketing application like mailwizz or on platforms like systeme.io or getresponse.
Overview of Postal SMTP Server
Postal is a complete and fully featured open-source mail server for use by websites and web servers. It is often described as a self-hosted alternative to popular services like SendGrid, Mailgun, or Postmark.
Unlike a basic mail server (like Postfix or Exim), Postal provides a great web interface that allows you to:
- Manage multiple organizations and “mail servers” under one installation.
- Track real-time analytics, including delivery rates, bounces, opens, and clicks. This will help you to know the health of your SMTP server at all point in time.
- Examine full message logs to troubleshoot why an email wasn’t delivered.
- Receive incoming emails and forward them to webhooks or other email addresses.
- Email routing: Postal doesn’t accept email but it has a great feature that routes all incoming email traffic to external email address or server that you provided.
Who Built Postal and Why
Postal was originally developed by aTech Media, a UK-based software company. They built it to handle their own massive volume of transactional and marketing emails because they needed a solution that was more flexible and cost-effective than what was available on the market.
In a move that changed the landscape for developers, they decided to release it as an open-source project. Their goal was to provide the community with a professional-grade mail delivery engine that anyone could run on their own hardware or VPS, ensuring data privacy and removing the per-email pricing barriers in platforms like getresponse or systeme.io that limit growing businesses.
How Postal Compares to SaaS SMTP Providers
When deciding between a SaaS (Software as a Service) provider like SendGrid and a self-hosted solution like Postal, it usually comes down to Cost vs. Control.
In short, while SaaS providers are great for small volumes, Postal SMTP server is the ultimate “power move” for 2026 if you want to send high volumes of email without the mounting monthly subscription fees.
Postal SMTP Server Setup Prerequisites
Before you run a single command, you need to ensure your infrastructure meets the technical and “reputational” requirements for modern email delivery.
Minimum Server Requirements (CPU, RAM, Storage)
Postal is a powerful, containerized application that runs several sub-services (MariaDB, RabbitMQ, and the Postal engine itself). It is significantly more resource-intensive than a simple Postfix setup.
For a stable production environment in 2026, we recommend the following minimum specifications:
- CPU: 2 vCPU Cores (Dedicated cores are preferred for high-volume sending).
- RAM: 4GB Minimum (8GB is highly recommended if you plan to send more than 50,000 emails per day to prevent “Out of Memory” crashes).
- Storage: 25GB NVMe SSD. Note that email logs can grow quickly; if you intend to store full message histories for months, consider 50GB or more.
- Operating System: Ubuntu 24.04 LTS or Ubuntu 22.04 LTS. Postal relies heavily on Docker, and these versions offer the best compatibility.
Choosing the Right VPS Provider
Not all VPS providers are “email-friendly.” In fact, many major providers like DigitalOcean, AWS, and Vultr block Port 25 (the port required for email) for all new accounts to prevent spam. Here at hostnamy we have written a post about the list of VPS providers with port 25 open and also best cheap VPS hosting for email marketing. You can check out the full list of vps providers with port 25 open through the link i provided above. I will also provide the list below:
- Contabo: Offers high-resource VPS plans at low costs, though they have a “per-minute” sending limit for new accounts.
- Hostwinds: Hostwinds generally leaves Port 25 open for their VPS instances by default. However, they are very proactive about protecting their IP reputation.
- RackNerd: Popular for being “email-friendly” with Port 25 often open by default or easily opened via support.
- isHosting / Colonel Server: Specifically marketed for high-volume email tasks with unrestricted SMTP traffic.
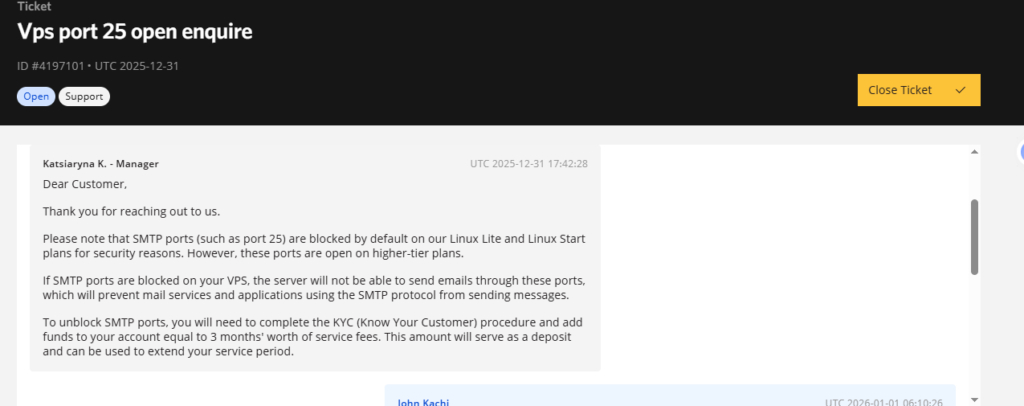
Note: Contabo, Hostwinds and Racknerd have port 25 open by default. But for Ishosting you need to complete a KYC verification before you can use their servers for mailing purposes. See the screenshot of the response to the ticket I opened with Ishosting requesting the status of their VPS port 25.
If you are using a different provider aside the ones I provided above, pls ensure to contact support to see if they open port 25. If you are not sure port open is open before contacting your provider, I will show you how to check it below.
Opening Port 25 and Managing IP Reputation
The ability to send Unlimited Emails depends entirely on your IP Reputation. If your server’s IP is blacklisted, your emails will go to spam regardless of how well Postal is configured.
- The Port 25 Test: Before installing Postal, run the command
telnet gmail-smtp-in.l.google.com 25. If you don’t get a connection, Port 25 is blocked, and you must contact your VPS provider to unblock it. - Clean IP Check: Before buying a VPS, use a tool like MXToolbox to check if the IP address is already on a blacklist. If it is, ask your provider for a fresh, clean IP.
- Reverse DNS (PTR Record): This is mandatory in 2026. Your IP must point back to your mail server’s domain (e.g.,
123.45.67.89->mail.yourdomain.com). Most VPS providers contabo, ovhcloud etc allow you to set this in their dashboard.
Important Note: “Unlimited” does not mean “Instant.” Even with Postal, you must warm up your IP by starting with 50–100 emails per day and gradually increasing the volume over 4 weeks to avoid being flagged as a spammer by Gmail and Outlook.
DISCLAIMER — A MUST READ.
Postal is meant for only legitimate senders and not spammers. Setting up your own SMTP server comes with significant technical commitments and legal obligations. So, if you are a spammer or your plan to send phishing email campaigns with your postal smtp server, I will advice you to keep off.
Step-by-Step Postal SMTP Server Setup and Installation (Docker)
Now let’s Setup Postal SMTP server and get things up and running!
Step 1: VPS Configuration
The first thing to do is to set up a VPS on any VPS provider of your choice. I am going with Contabo for this article as they offer solid server architectures at an affordable price, with port 25 open by default.

Step 2: Connect to Your Server through an SSH Client
Using SSH client like Termius, PuTTY, or your windows or mac Terminal log in to your VPS server. I’ll be using Termius as it is an all-in-one software that helps me to connect to both my SSH and the the vps file system all within the same application.
In case you are using Termius, add your server IP address and the password to the relevant fields on Termius when you have launched the app and click on connect, and you will be on your server command line. Alternatively, if you are using your terminal, connect to SSH by running the following code:
ssh root@YOUR_SERVER_IP
Ensure you replace the ‘YOUR_SERVER_IP’ part of the command with your real VPS server IP address.
Step 3: Update your system
The next thing you should do is to update the system and install prerequisites to postal installation:
sudo apt update && sudo apt upgrade -y
sudo apt install git curl jq -y
The above command ensures your server has the latest security patches, updates and the prerequisites for running postal.
Step 4: Install Docker Container
The developers of postal SMTP server recently updated Postal to runs on Docker, so we need to install the Docker container:
curl -fsSL https://get.docker.com | sh
Wait for docker installation to run. It takes some seconds to run.
Docker Compose Plugin is also used for managing other multiple containers:
sudo apt install docker-compose-plugin -y
Step 5: Verifying Docker Installation is Positive
Let’s verify Docker is installed correctly:
docker --version
If the above command runs successfully, your screen should output should see output the Docker version. If it fails or you get an error, restart your server and try again.

Step 6: Fetching the Postal setup Files
The below code fetches the Postal installation files:
git clone https://github.com/postalserver/install /opt/postal/install
sudo ln -s /opt/postal/install/bin/postal /usr/bin/postal
The above command downloads Postal and creates a symbolic link so you can run postal commands in almost any environment.
Step 7: Setting up MariaDB & RabbitMQ
Postal doesn’t work alone; it requires a database to store logs/configs and a message broker to handle the email queue.
- MariaDB: This is the database. Postal stores your organizations, users, and every single email log here. It is critical to use a strong password and ensure it is tuned to handle high-volume “writes” if you plan on sending millions of emails.
- RabbitMQ: This acts as the “waiting room” for your emails. When you send a bulk campaign, RabbitMQ holds the messages and feeds them to the Postal workers as fast as the network allows.
In the Docker setup, these are usually defined in your docker-compose.yml file, allowing them to communicate over a private internal network.
docker run -d \
  --name postal-mariadb \
  -p 127.0.0.1:3306:3306 \
  --restart always \
  -e MARIADB_DATABASE=postal \
  -e MARIADB_ROOT_PASSWORD=your_password_here \
  mariadb
Important Note: Replace ‘your_password_here‘ With a strong password, you can remember.
Step 8: Bootstrap Postal
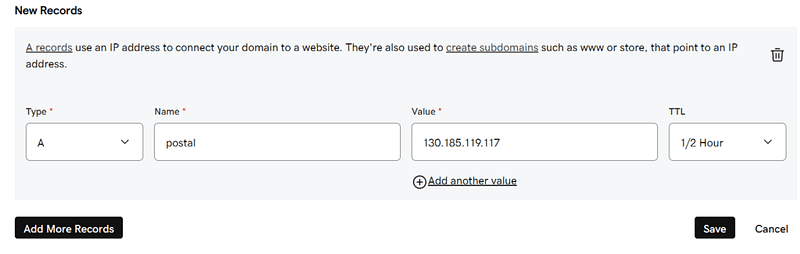
When you setup postal smtp server I advice you use a subdomain. This will help you access your postal SMTP server through a subdomain and not through the parent or root domain. Example: You can have something like mail.your_domainname.com, postal.your_domainname.com, or any sub-domain of your choice, but I am using postal.my_domain.com. Go to your domain provider, navigate to the advanced DNS zone, and add a new A record with the name set to postal, which in this case is my subdomain, and the value is the IP address of your own VPS. Don’t forget to change to your own IP address. Also understand you can change the postal subdomain to your own preferred subdomain (eg, send, mail.)
See screenshot below for more clarity:
Execute the command below to bootstrap Postal, but replace the ‘yourdomain.com’ with your own sending domain:
postal bootstrap postal.yourdomain.com
Step 9: Configure Postal Settings
Edit the Postal configuration file: Run the below command to edit the postal configuration file using the nano editor
nano /opt/postal/config/postal.yml
A file of this nature will open:
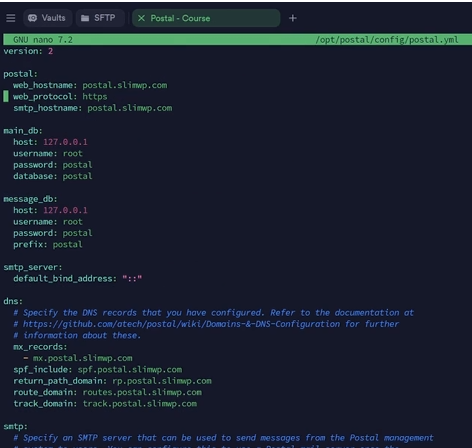
Here, you’ll need to set the database password (the one you used for MariaDB):
main_db:
  host: 127.0.0.1
  username: root
  password: your_mariadb_password_here
  database: postal
message_db:
  host: 127.0.0.1
  username: root
  password: your_mariadb_password_here
  prefix: postal
Quiting the nano editor in most operating system is very easy, follow these steps:
- Press
Ctrl + X
This will initiate the exit process. - If you have unsaved changes, nano will prompt you with:
“Save modified buffer?”
- To save your changes, press
Y(yes). - To discard changes, press
N(no).
- If you choose to save, nano will then ask:
“File Name to Write:”
- Confirm the filename by pressing
Enter.
After these steps, nano will close, and you will return to the command line.
Step 10: Initialize Postal Database
Execute the below command to initialize postal
postal initialize
Wait a couple of minutes for it to create all the necessary database tables and configurations.
Step 11: Create Admin User
Create your own postal admin user account:
postal make-user
Follow the prompts to add your emails, first name, last name, and postal password. You’ll use these credentials to log into the Postal web interface.
Step 12: Start the Postal server
Now, start the Postal server:
postal start
Postal should now be running! But, before navigating to it, we’ll need to set up Caddy so we can access Postal with our subdomain with a secure SSL. Caddy handles the postal SSL.
Run the below command, and SSL will be installed:
docker run -d \
  --name postal-caddy \
  --restart always \
  --network host \
  -v /opt/postal/config/Caddyfile:/etc/caddy/Caddyfile \
  -v /opt/postal/caddy-data:/data \
  caddy
Now you can access your Postal server securely at https://postal.yourdomain.com!

To access your admin area login using the credentials you defined when creating your admin user login.
Configuration of your mail server DNS
Here is where many people finds challenging or complex, let’s explain it in the easiest way possible. Think of DNS records as the technical details you give to the internet or ISP to prove you are the genuine sender to handle your email.
DNS Records Explained
The below table explains these technical details in the simplest way possible.
| DNS Record | Function | Simple Explanation |
|---|---|---|
| DKIM | The DKIM adds a digital signature to prove emails sent are truly from you or your server. | This is Like signing your letter with a secret pen only you have access to. |
| SPF | SPF Tells the internet which servers are allowed to send email on behalf of your domain | Like giving the post office a list of people allowed to use your return address |
| rDNS/PTR | I regard this as the opposite of domain mapping. rDNS/PTR record Links your server’s IP back to your domain name | Like someone checking your phone number and seeing your real name |
| Return-Path | This is where bounced emails go if delivery fails | Like putting your return address on an envelope |
How to configure the DNS:
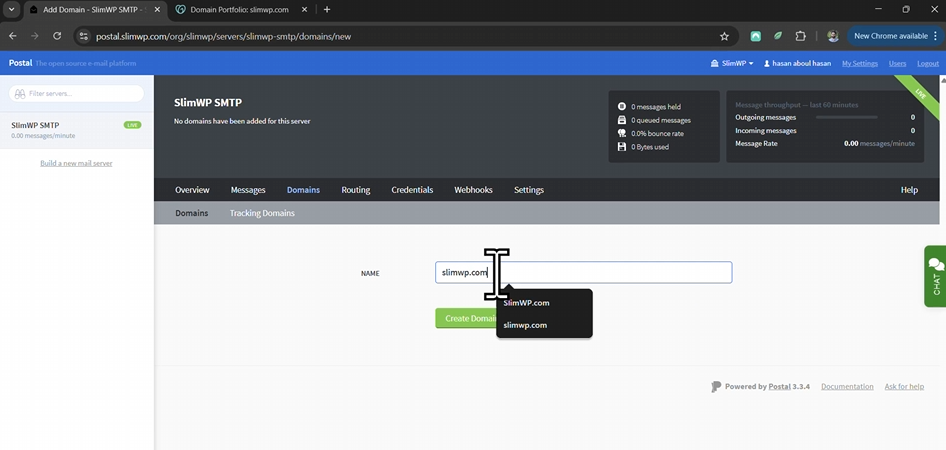
After logging in to your postal dashboard, the next thing is to add your domain as we did above. Go to the Domains tab and click on add your domain ( This should be your domain not the subdomain) like this:
Let’s now configure our DNS records to complete our mail server configuration and authentication:
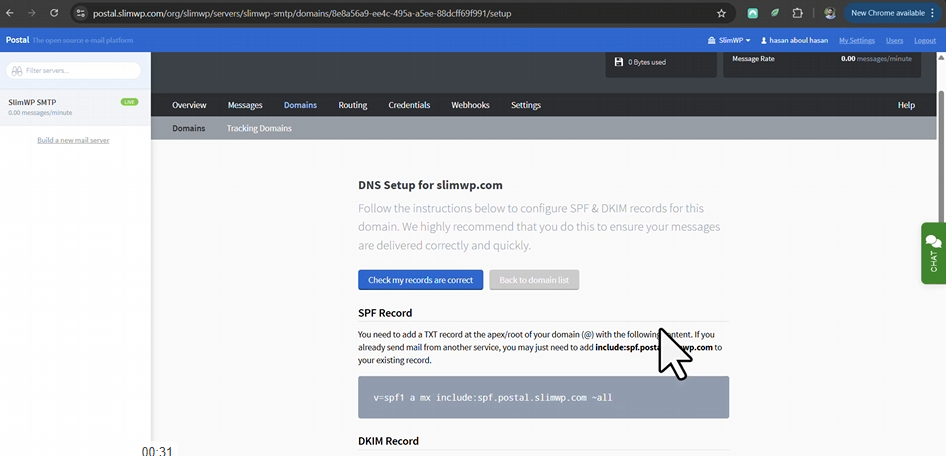
Now go to your domain registrar as we did above when we set up our Postal subdomain, and add the following DNS records that Postal that postal has given us.
1. Sender Policy Framework (SPF Record):
The SPF record specifies to email providers that only your server or servers (IP/IPs) can send emails on behalf of your domain. This helps to prevent email spoofing, and prevent people from sending emails with your domain which isn’t from you.
Go to the advance DNS record of your domain registrar and add the following TXT record:
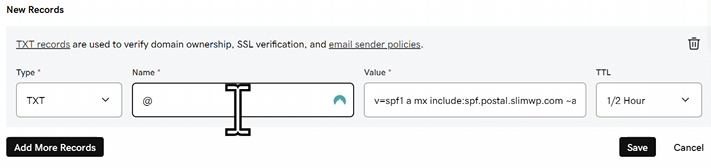
Replace YOUR_SERVER_IP with your real VPS server IP address.
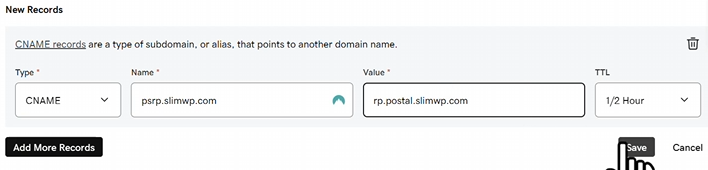
2. The Return-Path Record (Automatically Handled by Postal)
Just as we did above, click on add new record, but this time around, choose CNAME record like this:
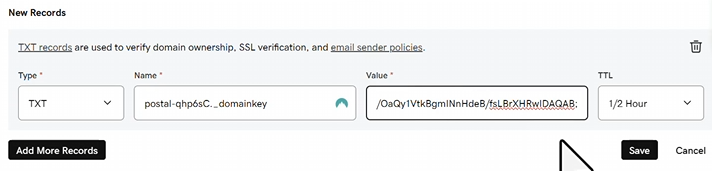
3. The DKIM Record (DomainKeys Identified Mail)
This record provides a way for email providers to verify that your emails haven’t been compromised on server level or on transit.
Under the SPF record on Postal, you’ll find your DKIM record and value, also add them in like manner as you have been doing above:
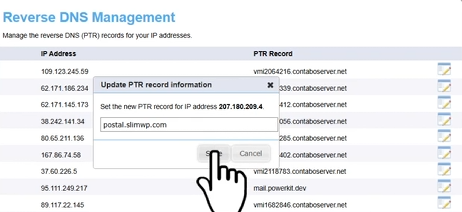
4. rDNS/PTR Record (Reverse DNS)
Like I said before, I consider this the opposite of domain mapping. Email service clients like Gmail, yahoo, outlook queries this to ensure your server isn’t spoofing or impersonating a domain. Without it, your emails will likely go to spam. Let’s see how to set this up on Contabo. It is almost the same process irrespective of the VPS provider you are working with:
- Log into your Contabo Customer panel
- Go to your Reverse DNS Management section
- Find the IP address of the VPS you installed Postal.
- Click on edit and change the domain to your own subdomain eg:
mail.yourdomain.com
Here’s a sample case:
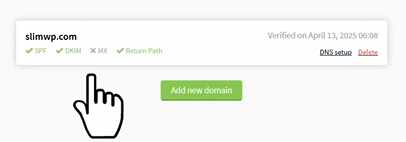
After adding the above 4 records, scroll to the top of the page on your Postal dashboard and click on ‘check if your records are correct’:
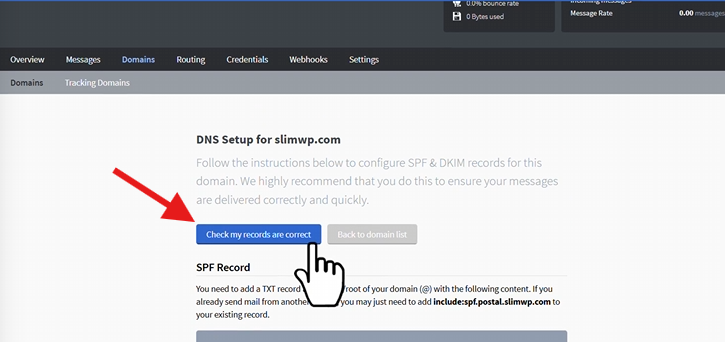
After seconds, it should show as in the screenshot below:
Note: Sometimes it may take up to 24-48 hours for all the DNS records to finish propagating.
How to warmup your SMTP Server
Email warmup is gradually building your IP’s reputation with email providers. This is why it is important:
- Virgin or New IPs are treated as new to the internet and with suspicion
- Sudden volume spike = translates to spam in the eyes of email service providers
- Gradually ramping up or increasing volume is what builds trust.
- Good subscriber engagement rates improve reputation.
I came across this website that helps me plan my warmup strategy and you can try that too: SMTP Warmup Scheduler on PowerKit.
Depending on your estimated email volume this tool provides you with the following:
- Day-by-day sending schedule
- Volume recommendations
- Recommended number of IPs to use
- Best Practices
So this is how you can get your postal SMTP server up and running, and if you encounter any issues, you can send me an email at support@hostnamy.com, and I will be happy to assist you further.