In our last two guides, I showed you how to install cyberpanel on contabo and how to install WordPress on CyberPanel . Today, let’s see how to install WordPress on Ubuntu on any VPS without any control panel. In our last tutorial, where we installed WordPress on CyberPanel, CyberPanel already came with all the server resources and stack needed to run your WordPress website. It came with the LiteSpeed web server, database, etc.
Now, if you’re aiming for a no-control-panel setup, you’ll also need an environment with a web server, a database, and the programming language for handling dynamic content installed. Now, let’s go into how to install WordPress on Ubuntu OS properly.
Table of Contents
- Introduction
- What is the LAMP Stack
- Purchasing Requirements
- Contabo Server configuration
- Configuring rDNS and Domain Mapping.
- Installing WordPress on your server
- Setting up a Database
- Installing SSL certificate via certbot
- Conclusion
What is the LAMP Stack
LAMP server is an acronym representing a popular open-source web server stack. It stands for Linux (operating system), Apache (web server), MySQL (database), and PHP/Perl/Python (programming language). This combination provides a powerful and flexible platform for hosting websites and web applications. Lamp is widely used due to its performance, cost-effectiveness, and community support. The components work together, with Linux as the foundation which is our VPS, Apache handling web requests, MySQL storing data, and PHP/Perl/Python processing dynamic content. Without the LAMP Stack we will have to install Apache, MySQL, and PHP independently.
After finishing the LAMP we will see How to install WordPress on Ubuntu and run the wordpress script on our server. Ready? Let’s go..
Purchasing Requirements
To install WordPress on Ubuntu, we need two things:
- A domain name: You can get one from Namecheap.
- A Contabo VPS server, Verpex, Hostwinds, racknerd, ishosting : You are not obliged to use these vps I listed. You can use any VPS provider of your choice, just understand that irrespective of the VPS provider you are using the processes are just the same. I chose Contabo because they offer the best server resources at a very affordable price.
How to install WordPress on Ubuntu on Contabo
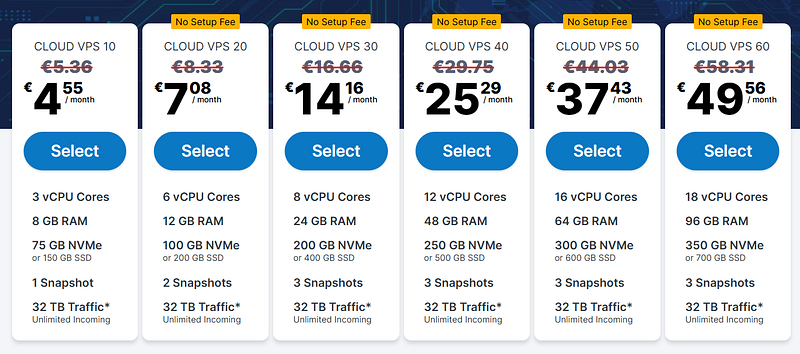
Visit the VPS Pricing page of Contabo. You can start with any cloud plan of your choice and scale later as your traffics grows. I recommend the ~$14/month plan.
Go to the next page, where you will configure your server Imagery and APPs. Ensure to choose LAMP on Ubuntu 20.04 upwards. In my case, I chose Ubuntu 22.04. Add a strong password to your server. Pls, follow this process if you are using any of the other VPS providers we recommend or anyone of your choice.

Click on Next to log in or register and checkout.
Configuring rDNS and Domain Mapping.
We have talked about domain mapping in our previous guide on how to install cyberpanel on contabo, you can check it out if you want.
Now back to the tutorial, on your Contabo dashboard, locate your PTR record, add your domain name. This is the domain you will use to access your WordPress website. You can also use a subdomain if you want to access your wordpress website through a sub domain.
Next, perform your domain mapping. This is the process of pointing your domain to your server IP address. This verifies you are the real owner of the domain and allows you access to resources on the VPS.
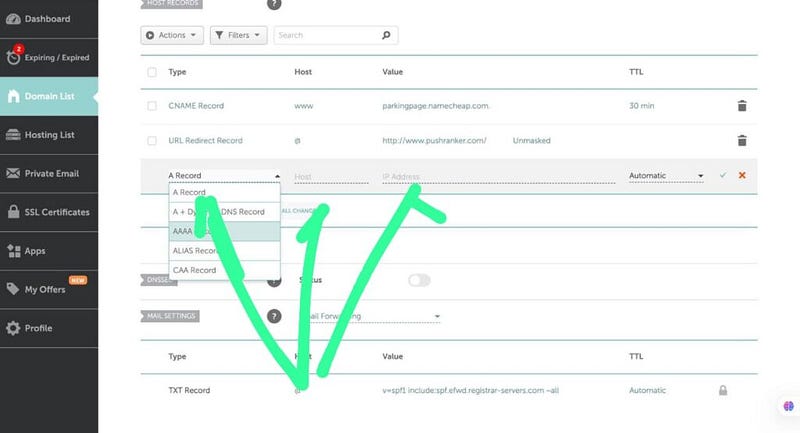
This is a Namecheap sample domain mapping. Using the basic Namecheap DNS, go to Advanced DNS. Select A record, at the host section add @, then at the IP placeholder part add your VPS IP address. Save changes, and you are done.
Note: rDNS is technically the opposite of domain mapping. Domain maps your domain name to your server IP address. rDNS maps your server IP to your domain name. Both process verifies you are the owner of the domain and the server, and allow you to access the server resources using the domain name instead of the server IP.
How to Install WordPress on your ubuntu server
Now, you are all set to install WordPress on your server. Let’s see the steps to getting this done quickly.
Step 1: Download the WordPress script.
Go to wordpress.org and download the latest version of WordPress. The file you downloaded is going to be a zip file. Connect to the file system of your VPS. You can use any FTP client of your choice. I recommend you download, install, and use Termius. I use it a lot because it is both an FTP client and an SSH client. If you use the Mac terminal or PuTTY as your SSH client, you will still need to download another ftp client like FileZilla; you will use it to access your file system. So, I see this as a lot of stress. I prefer using Termius as I can easily switch between SSH and the file system within the same application.
Step 2: Uploading the WordPress zip file
Open your Termius or any FTP client of your choice and upload the WordPress zip file. Ensure you upload it to the following path: var/www/html. This is the root of your website. If you found any other file or folder in that directory, delete it. Just for the record, you may find a file named ‘logo’; ensure you delete it. Just delete anything you find in that path and upload the WordPress file you downloaded from wordpress.org.

Now run the following commands via SSH:
cd /var/www/html
This navigates you to the path where you uploaded your WordPress zip file. To confirm this, run the following command:
ls
You can see the WordPress file below.

Step 3: Unzipping the WordPress file
The next step we are taking is to unzip your WordPress file and to do it, run the following command:
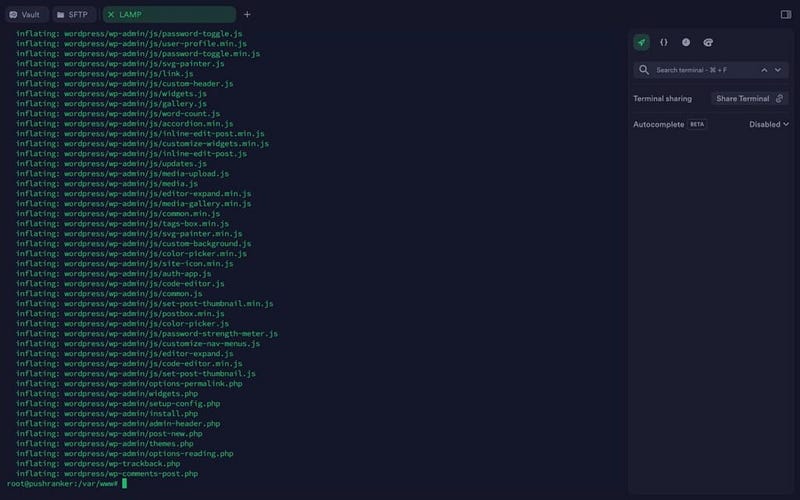
unzip wordpress-6.8.2.zip
Make sure the ‘wordpress-6.8.2.zip’ is your own WordPress file name. If it is not, it won’t work. That said, if all things go well, you see a screen like this:
No, go back to the path you uploaded the WordPress file to in your file system and refresh. You will see that the file is now unzipped.

Now delete the zip file and leave only the folder that is unzipped.
Now remember that the core WordPress files are inside the ‘wordpress’ folder. To access WordPress, you have to go to yourdomainname.com/wordpress or slash any folder that contains your WordPress file.
Now there is an issue now. We want to access WordPress right at the root of our domain name. We simply have to move the core WordPress files inside the ‘wordpress’ folder to the following path: var/www/html. To perform this action, run the following command:
sudo mv /var/www/html/wordpress/* /var/www/html/
Now, all contents are inside the HTML folder. To delete the now-empty ‘wordpress’ folder, right-click on it in your file system and delete or run the following command via SSH:
sudo rmdir /var/www/html/wordpress
Refresh /var/www/html/ directory and you will see the WordPress folder has been removed.
Completing Installation in your Browser
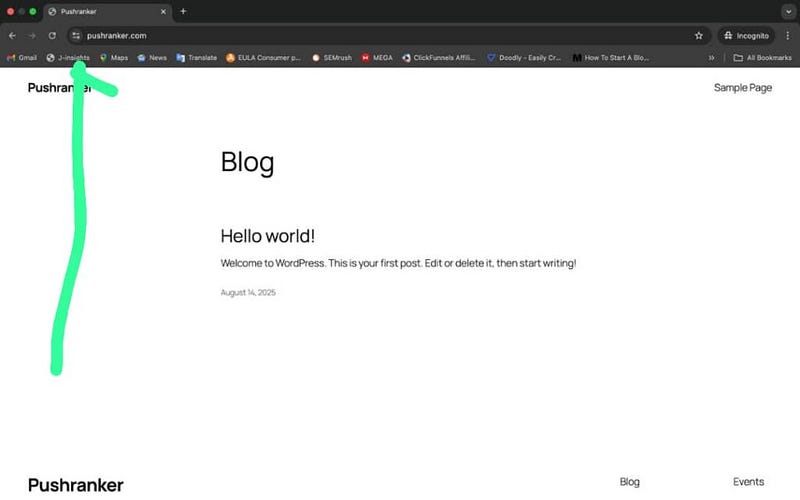
Now visit your domain name, and you will see the WordPress setup prompt.

You will be prompted to fill in the following:
- Database name
- Database username
- Database password
- Database host
- Table prefix (if you want to run more than one WordPress in a single database)
WordPress is just like other web applications that need a database to run and store information. Let’s see how to set up a database and connect, and run WordPress.
How to setup a Database on your server
To create a database, you need to log in to MySQL (An open-source database software). Remember when you installed LAMP on your VPS, MySQL was installed alongside. Run the following command to create a database:
mysql -u root -p
You will be asked to input your MySQL root password. Supply it. Ensure the dash in the above command is the regular minus sign and not the en dash
Run the following command to create the database:
create database wordpress;
What this does is; it creates a database with the username ‘wordpress’. Please feel free to use any name of your choice.
Now create a user to access the database:
create user 'wordpress'@'localhost' identified by 'PASSWORD';
What the above command does is to create a user with the name ‘wordpress’ with a password you will define at the ‘PASSWORD’ placeholder in the above command.
Note: Input a very strong password by replacing PASSWORD in the command above. Ensure your password is enclosed inside the double apostrophe. Also, understand that every command inside MySQL ends with a semicolon (;).
Now give the database user access to the WordPress database with this command:
GRANT ALL PRIVILEGES ON wordpress.* TO 'wordpress'@'localhost';
FLUSH PRIVILEGES;
EXIT;
The above command does the following: Here’s what happens:
GRANT ALL PRIVILEGES...;→ gives all privileges to the user.FLUSH PRIVILEGES;→ reloads the privileges so they take effect immediately.EXIT;→ closes the MySQL/MariaDB shell and returns you to your normal terminal.
Now that we have created our database, go supply it and continue your installation.
Quick Note:
Just in case your web servers are not able to write the wp-config.php file automatically during the installation process. If that is the case with you, WordPress won’t automatically create the wp-config.php file for you during installation. It will prompt you to create the file manually, then generate the wp-config.php content for you. All you have to do is copy the code exactly and create a wp-config.php and paste i,t and save.
To create the wp-config.php file, go to your terminal and run the following command:
sudo nano wp-config.php
It will create and open the file using the Nano editor. Paste the content of the wp-config.php given to you by the installer and save.
To save and exit Nano, Save and exit Nano.
- Press
COMMAND +S → Enter (to save) - Press
CTRL + X - Y then hit enter.
Go back and finish up the installation. Add your site title, username, password, etc.
Note: Just like I said, you may not face this issue. I just have to walk you through this so that if you face it in any way, you can know how to go about it.
That said, there is one issue left: our website is not secured with SSL.

Installing SSL certificate via certbot
Securing the internet data, login, and data transfer is a huge part of cybersecurity. Ensuring there is an SSL Certificate on your website will not only secure you and your users but will also give you a higher ranking on Google. Here we will run certbot, which lets you generate free Let’s Encrypt certificates that are valid for 90 days. To fetch and install Certbot, run this command to install Certbot:
apt install certbot python3-certbot-apache -y
After installing Certbot, start Certbot with this command:
certbot --apache
Note: that when you start the program for the first time, you’ll need to agree to some license terms & conditions (choose Y in all prompts).
You should see a list to define the site where you want the certificate to be installed. If you have more than one domain, just list them with a comma separating them.
So, this is how to install WordPress on Ubuntu manually and run your website. You have to be really proud of yourself for how far you have come. Even if you are not a technical person, you must have learned one or two things. Remember, you are not alone. If you have any questions or issues, let me know in the comment section or send me an email at support@hoatnamy.com.