If you are looking for how to install wordpress on CyberPanel you are at the right place. Cyberpanel provides a very simple intuitive interface that makes one click installation possible. CyberPanel is built from the ground up to support OpenLiteSpeed, you aren’t just getting a website; you’re getting a complete package with server-level caching (LSCache) that can handle traffic spikes that would crash a standard Apache or Nginx setup.
In this guide, we’ll walk you through how to Install WordPress on CyberPanel. We’ll ensure your site is secure, fast, and ready to rank from the moment you hit the Publish button.
Prerequisites to Install WordPress on Cyberpanel
To ensure a smooth move from your Contabo server setup to Install WordPress on Cyberpanel, you must have a few technical boxes checked. Skipping these steps is the #1 reason users face the “Your connection is not private” error or “404 Not Found” screens.
DNS Setup: Pointing Your Domain
Before CyberPanel can issue an SSL certificate for your WordPress site, your domain must be mapped or linked to your server’s IP address.
- The A Record: Log in to your domain registrar (e.g., Namecheap) or Cloudflare. Create an
Arecord with the name@(or leave it blank) and point it to your Contabo Server IP. - The WWW CNAME: Create a
CNAMErecord forwwwand point it to your root domain (e.g.,hostnamy.com). This helps to redirect all www request to the root of your domain which in my case is hostnamy.com. - Propagation Check: Use a tool like
dnschecker.orgto verify that your domain is correctly resolving to your IP. Do not proceed with the installation until the green checkmarks appear.
Choosing the Right PHP Version for 2026
CyberPanel allows you to run multiple PHP versions simultaneously, but for a new WordPress install in 2026, you should prioritize speed and security.
- Recommended Version: Select PHP 8.3 or 8.4. These versions offer the best performance for the latest WordPress core script and are fully supported by the LiteSpeed engine.
- Note: If CyberPanel doesn’t show PHP 8.4 in your list, you can quickly install it via your SSH terminal using the command:
apt-get install lsphp84*.
Accessing Your Dashboard
Ensure you have your CyberPanel login credentials ready. By default, you can access your panel at:
(If you followed our previous guide or mapped your domain properly, you can access your cyberpanel through your domain name https://yourdomain.com:8090 instead instead of via https://your-server-ip:8090/)
How to Install WordPress on Cyberpanel (Namecheap Case Study)
Like I said before, follow our guide on how to install cyberpanel on a VPS if you haven’t.
Also, ensure to map your domain name. This is so that you can access your website with your domain name instead of your VPS IP address. Let’s see how to map your domain to your VPS IP address on Namecheap.
Log in to your Namecheap account > go to the Domain List > Manage > Select the ‘Advanced DNS’ tab.
In the ‘Host Records’ section, you’ll find the option to add a new record. Create an A record. In the ‘Host’ field, enter ‘@’ (which represents your domain) or a subdomain.
In the ‘IP Address’ field, enter the IP address of your VPS. Finally, save the changes. It may take some time for the DNS changes to propagate across the internet and devices.

Once your domain mapping is done, you need to access your CyberPanel dashboard to be able to create a WordPress website.
How to login to CyberPanel
- Log in to CyberPanel dashboard: To log in to CyberPanel go to https://yourdomainname.com:8090/. You will see a login page like the one below:

If for any reason you don’t know your password, log in to your server via SSH and run the following command:
sudo cat .litespeed_password
Then you should have your password displayed on the terminal. Copy your password to a notepad or a safe password manager. Also, note that cyberpanel default username is ‘admin’
How to Create a website on Cyberpanel
- Navigate to Websites > Create Website
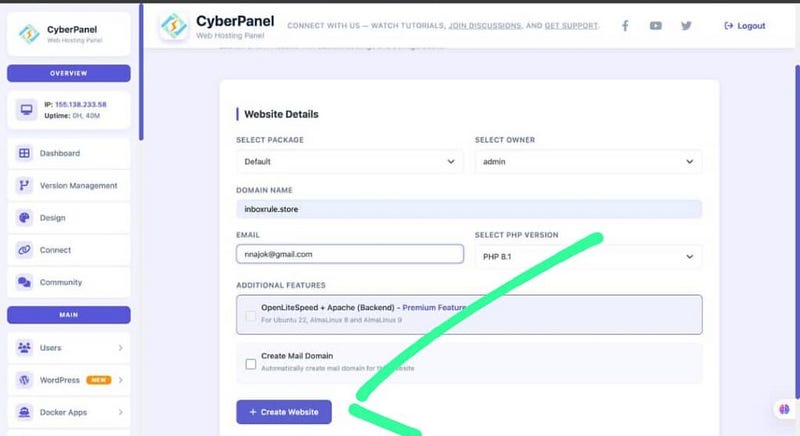
- Enter domain name
- Select package as default
- Select owner as admin
- Enter your email address
- Choose a PHP version and handler
The Must-Check Additional Features
At the bottom of the page, you will see a list of checkboxes. For a professional setup, you must check these three:
- SSL: Checking this will trigger CyberPanel to automatically request a free Let’s Encrypt SSL certificate. (This only works if your DNS is already pointed to the server).
- DKIM Support: This is essential for your email deliverability. It signs your outgoing emails so they don’t end up in your customers’ spam folders.
- open_basedir Protection: This is a security feature that prevents a script from accessing files outside of its own directory—effectively “jailling” your WordPress site for its own safety.
Now go to websites > list websites > select the domain you added to CyberPanel> Click on manage
How to Install WordPress on Cyberpanel
Now, scroll down and you will WordPress one-click installer option as seen in the picture below:

- Choose WordPress > Install WordPress
- Set WordPress admin username and password
- Enter your email address and ensure the installation path or directory is left empty. This is so that WordPress can be installed on the root of your domain. Now launch WordPress and wait for a moment for CyberPanel to install WordPress for you. Then visit your domain, and you should see WordPress installed already.
WordPress Post-install basics on Cyberpanel
- Log in to WordPress: https://yourdomain.com/wp-admin
- Run recommended plugins/themes (keep it lean initially)
- Enable SSL:
- CyberPanel > SSL > Manage SSL > Cert Manager
- Permalinks setup: Settings > Permalinks > Post name
- Ongoing optimization
- Backups: CyberPanel > Backup/Restore > Schedule backups
- Caching: CyberPanel > OpenLiteSpeed/LSCache configuration
- Resource monitoring: CyberPanel dashboard widgets or server stats
- Security hygiene: update WordPress core/themes/plugins regularly
Post-Installation Optimization (The 2026 Standard)
Installing WordPress is only half the battle. To ensure your site is truly optimized for 2026’s aggressive SEO and performance standards, you must perform these steps. Without these, you are leaving your server’s true speed untapped.
Forcing HTTP to HTTPS
Even if you issued an SSL during the website creation, WordPress might still try to load over an insecure connection. To fix this permanently at the server level:
- In CyberPanel, go to Websites > List Websites > Manage.
- Scroll down to the Configurations section and click on Rewrite Rules.
- From the template dropdown, select Force HTTP to HTTPS.
- Alternatively, paste this code into the box:
RewriteEngine On
RewriteCond %{SERVER_PORT} 80
RewriteRule ^(.*)$ https://%{SERVER_NAME}%{REQUEST_URI} [R=301,L]
5. Click Save Rewrite Rules.
Activating and Verifying LSCache
CyberPanel installs the plugin, but it doesn’t always “handshake” with the server automatically.
- Log in to your WordPress dashboard (
/wp-admin). - Go to LiteSpeed Cache > Dashboard.
- If you see a “LiteSpeed is Not Enabled” warning, go to General and request a Domain Key.
- Verification: Visit your site in an Incognito window. Right-click > Inspect > Network. Refresh the page and click on your domain name under the “Name” column. Look for the header:
x-litespeed-cache: hit. If you see “hit,” your site is loading at light speed!
Tweaking PHP for Large Uploads
By default, PHP limits file uploads to a tiny 2MB, which will block you from uploading many premium themes or plugins.
- Go to PHP > Edit PHP Config in CyberPanel.
- Select the PHP version your site is using (e.g., PHP 8.3).
- Change
upload_max_filesizeto 100M andpost_max_sizeto 110M. - Click Save Changes and then click the Restart PHP button to apply them.
Summarily, this is how to install WordPress on Cyberpanel and run your WordPress site.
Got more questions on How to install wordpress on Cyberpanel?
You can send me an email at support@hostnamy.co. I will also be in the comment section to hear your thoughts and to answer any question you may have.