In 2026, web speed is no longer a negotiable. It’s a must requirement when considering launching your online business. If you want a server that can handle high traffic cost-effectively, learning how to install CyberPanel on Contabo is the smartest move you can make. Secondly, you can host multiple websites without incurring extra hosting cost. There are a lot of control panels out there, such as cpanel, vestaCP, Spane,l etc. You can explore them if you are adventurous.
Contabo provides the massive resource allocations, while CyberPanel provides the a sleek, user-friendly interface powered by the world’s fastest web server technology: OpenLiteSpeed. Whether you are migrating away from expensive cPanel licenses or launching a new high-performance WordPress site, this guide will walk you through the process of turning a raw Contabo VPS into a professional hosting machine in under 15 minutes.
This guide will walk you through how to install Cyberpanel on Contabo VPS without worries about much server technicalities.
Just in case you love video, I have made a youtube video on How to install Cyberpanel on Ubuntu 22.04. In this video I Vultr but the process is the same as contabo that you will be using here.
You can also checkout other of our articles
Setup Postal SMTP Server — Send Unlimited Emails 2026
How to create SMTP with Mailinabox and send unlimited emails.
List of VPS providers with Open Port 25
Why Choose CyberPanel and Contabo in 2026?
The combination of CyberPanel and Contabo isn’t just about saving money; it’s about achieving enterprise-grade performance on a cost-effective budget without sacrificing performance.
The OpenLiteSpeed Advantage: Built for Speed
Most traditional control panels (like cPanel) rely on the Apache web server, which can become sluggish under heavy traffic. CyberPanel is built on OpenLiteSpeed, the open-source version of the world’s fastest web server technology.
- 10x Faster than Apache: OpenLiteSpeed handles thousands of concurrent connections with minimal CPU usage.
- LSCache Integration: This is CyberPanel’s secret weapon. It provides server-level caching for WordPress, Magento, and Joomla, often outperforming standalone caching plugins like WP Rocket.
- HTTP/3 Support: CyberPanel comes ready for the latest internet protocols, ensuring your sites load instantly across all 2026 devices.
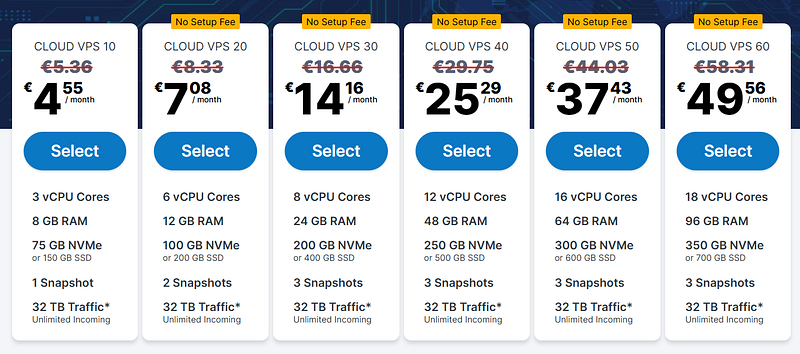
Contabo’s Price-to-Performance Ratio: More Muscle for Less
while other providers are raising prices, Contabo remains the leader in Resource Density.
- Massive RAM Allocations: Even Contabo’s entry-level VPS plans typically offer 8GB to 16GB of RAM, whereas competitors might only offer 1GB or 2GB for the same price.
- NVMe Storage: Contabo uses Gen4 PCIe NVMe SSDs, which provide the high-speed read/write operations necessary for CyberPanel’s databases to fly.
- Global Reach: With data centers across the US, Europe, and Asia, you can deploy CyberPanel close to your audience to minimize latency.
Comparing CyberPanel to cPanel and Plesk
As licensing costs for commercial panels like cPanel continue to climb, CyberPanel has emerged as the premier free alternative.
| Feature | CyberPanel (Free) | cPanel (Paid) | Plesk (Paid) |
|---|---|---|---|
| Monthly Cost | $0 (Free Forever) | $15 - $60+ | $12 - $50+ |
| Web Server | OpenLiteSpeed (Fastest) | Apache / Nginx | Apache / Nginx |
| Resource Usage | Lightweight | Heavy | Moderate |
| WordPress Tools | Built-in LSCache & Staging | WordPress Toolkit | WordPress Toolkit |
| 2026 Tech | Full Docker & Git Support | Limited | Good |
Install Cyberpanel on Contabo.
Like I said earlier Contabo is an excellent choice for running CyberPanel on a VPS. They offer high-end server resources at a very affordable price, making it the best choice for developers, startups, and growing businesses. Now, let’s go into how to install Cyberpanel on Contabo proper:
Requirements for Installation.
To install CyberPanel on contabo, you need to ensure that you meet the following specifications:
- A domain name from namecheap or any domain of your choice
- Contabo VPS Server with fresh installation of Ubuntu 18.04, Ubuntu 20.04, AlmaLinux 8, AlmaLinux 9, Ubuntu 22.04, or CloudLinux 8.
- At least 1024 MB RAM, or higher
- 10GB Disk Space
The good thing is that contabo offers more than these resources at a cheap price. That said, let’s get into the installation proper.
Essential Tools to Install Cyberpanel on Contabo.
You won’t be installing this through a web browser; you need to talk to your server directly.
- SSH Client: If you are on Windows, download PuTTY or use the built-in Windows Terminal. If you are on a Mac or Linux, you can simply use your native Terminal.
- Root Access: Ensure you have your Contabo “Root” password handy. This was sent to you in your “Your login data” email when you first purchased the VPS.
- Port 25 Check: If you plan on using your CyberPanel server to send emails, ensure your Contabo account has Port 25 open (common for new accounts to have a temporary block which can be removed via a support ticket).
Cyberpanel licenses
It is very important to understand that there are two types of cyberpanel. We have the normal CyberPanel and the enterprise version. However, they’re the same in both versions. The only difference is the web server running each of the versions.
- Normal CyberPanel comes with the OpenLiteSpeed web server, and it is completely free to host an unlimited number of domains.
- CyberPanel Enterprise comes with LiteSpeed Web Server Enterprise, and it is free for one domain. If you want more domains to be hosted, you can get different plans according to your needs on their Pricing page.
Pre-configuration before installing cyberpanel on contabo
Before you can run the command to install CyberPanel on Contabo, you need to ensure your VPS is in a ready state. Many installation failures happen because of leftover configurations from previous OS versions or incorrect hostname settings.
Preparing Your Contabo VPS for cyberpanel Installation
Contabo makes it very easy to manage your server through their Customer Control Panel (CCP). Follow these steps to ensure your environment is in the original condition.
1. Accessing the Contabo Customer Control Panel
Log in to your account at my.contabo.com. This is where you control the physical aspects of your virtual server. Once logged in, navigate to VPS Control on the left-hand sidebar to see your active instances.
2. Performing a Clean OS Reinstall (Crucial)
If you have been experimenting with your server or it came pre-installed with a bunch of software you don’t recognize, it is best to start fresh.
- In the VPS Control area, find the “Reinstall” button next to your server.
- Select Ubuntu 22.04 LTS (or 24.04) from the dropdown list.
- Set a strong Root Password. Do not lose this! You will need it to log in via SSH.
- Click Install. It usually takes about 3–5 minutes for Contabo to wipe the drive and install the new OS.
3. Gathering Your Server Identity
While the OS is installing, make a note of your Server IP Address. You can find this in the VPS Control list. This IP is what you will use to connect to your server and, eventually, to access your CyberPanel dashboard.
4. Managing the PTR Record (Reverse DNS)
To ensure your server is professional and ready for email delivery:
- In the Contabo panel, go to “IP Management.”
- Look for the PTR (Reverse DNS) column.
- Set your PTR to your intended primary domain or hostname (e.g.,
srv1.yourdomain.com). This small step prevents many networking issues later on.
Pro-Tip: If you just bought your VPS, wait for the status to change from “Installing” to “Running” before attempting to connect. If you try to log in too early, you will get a “Connection Refused” error.
Installing Cyberpanel on Contabo.
I will be using Ubuntu 22.04. Installing CyberPanel is simple: Let’s see the process shortly:
- Step 1: Connect to the server command line via SSH client. (Termius, Putty, Bitvise, etc)
Log in as a Root user (Sudo will not work). You can get the Login details from Contabo or any web host you are using. - Step 2: Update server Packages.
Update your server OS first (This updates all services and provides much better compatibility to run your installation). Run the following command
sudo apt update && sudo apt upgrade -y
Note: Ensure your server is running on ubuntu OS because the above code and the codes here are for ubuntu OS.
Step 3: Run the Installation Script.
Run the command below to automatically download and run the CyberPanel installation script. This will prompt you to choose the LiteSpeed version and additional add-ons you wish to install on your server.
sh <(curl https://cyberpanel.net/install.sh || wget -O - https://cyberpanel.net/install.sh)
- Step 4: Select the version of LiteSpeed that you would like to use.
As said before CyberPanel has two types, the normal version and the enterprise version. Select to install CyberPanel with openlitespeed.

- – Remote MySQL (default N):
Wait for your Database to be installed on a remote server

CyberPanel Version (default Latest Version):
You can choose to install a previous version of CyberPanel, or press Enter to install the latest version.

– Password (default “1234567”):
Using the default password is not advisable. It is recommended to set a strong password of your own by choosing ‘s’ or generate a random password by selecting ‘r’. After the installation, you will see the password prompt displayed on the screen.

Memcached (default Y):
Distributed memory object caching system

Redis (default Y):
In-memory data structure store, used as a database, cache, and message broker

Watchdog (default Yes):
A kernel watchdog is used to monitor if a system is running. It is supposed to automatically reboot hung systems due to unrecoverable software errors.

Step 6: The installation process will initiate automatically and is expected to be complete within 5–10 minutes, depending on your server’s speed.
Step 7: Finalize Installation. Upon completion of the installation process, you will encounter a screen displaying important information regarding your configuration. I recommend you select and copy this information to a safe place for future use.
Accessing the CyberPanel Dashboard
Because CyberPanel runs on its own internal web server, it uses a specific port to keep the admin panel separate from your public websites.
1. Navigating to the Login URL
Open your preferred web browser and type your server’s IP address followed by the default CyberPanel port: https://[Your_Contabo_Server_IP]:8090
Note on Browser Safety: On your first visit, you will see a screen that says “Your connection is not private” or “Potential Security Risk.” This is completely normal! It happens because the panel is using a temporary self-signed SSL certificate.
- To bypass this: Click Advanced and then select “Proceed to [Your IP] (unsafe)”. We will replace this with a real Let’s Encrypt SSL in the next step.
2. First-Time Login
You will be greeted by the CyberPanel login screen. Use the credentials you set (or were generated) during the installation:
- Username:
admin - Password: Enter the custom password you chose during Step 3. (If you used the default, it is
1234567, but you must change it immediately).
3. Securing the Administrator Account
The first thing you should do inside the dashboard is ensure your security is up to date for 2026 standards.
- Go to Users > Modify User in the left-hand sidebar.
- Select the
adminaccount. - Update your email address to a real one so you can receive system alerts.
- If you haven’t already, update your password to something highly secure (16+ characters).
4. A Quick Tour of the Interface
- Websites: This is where you create new hosting accounts and manage files.
- SSL: Where you’ll issue certificates to keep your sites secure.
- Database: For creating and managing MySQL/MariaDB databases.
- DNS: To manage your domain’s records if you choose to use CyberPanel as your Nameserver.
Post-Installation Essentials
In 2026, browsers are stricter than ever. If you don’t complete these three tasks, you will constantly face security warnings and your emails will likely bounce.
1. Pointing Your Domain to Contabo
Before CyberPanel can issue an SSL certificate, your domain name must “point” to your server’s IP.
- The Record: Log into your domain registrar (Namecheap, GoDaddy, etc.) or Cloudflare.
- A Record: Create an
Arecord for your main domain (e.g.,yourdomain.com) and a subdomain (e.g.,srv1.yourdomain.com). Set the value to your Contabo Server IP. - Wait for Propagation: It can take anywhere from 5 minutes to 2 hours for this change to spread across the internet.
2. Issuing a Hostname SSL (Removing the Privacy Warning)
Remember that “Not Private” warning when you first logged in? Here is how to fix it:
- In CyberPanel, navigate to SSL > Hostname SSL from the left sidebar.
- Select your hostname from the dropdown (e.g.,
srv1.yourdomain.com). - Click Issue SSL.
- Important: Once the success message appears, restart the CyberPanel engine by typing
systemctl restart lscpdin your SSH terminal. Now, when you visithttps://srv1.yourdomain.com:8090, the green padlock will be there.
3. Creating Your First Website and WordPress Install
CyberPanel makes launching a site incredibly fast thanks to its “One-Click” installer.
- Go to Websites > Create Website.
- Select the Default package and choose
adminas the owner. - Enter your domain name and a contact email.
- Select Features: Check the boxes for SSL, DKIM Support (for email), and open_basedir protection.
- Once created, go to Websites > List Websites > Manage.
- Scroll down to the “Application Installer” section and click WP + LSCache.
- Why LSCache? This is the specialized plugin that talks directly to the OpenLiteSpeed server on your Contabo VPS, making your WordPress site load up to 10x faster.
4. Setting up PHP and Caching (2026 Optimization)
Since Contabo gives you plenty of RAM, you should optimize your PHP settings.
- Go to PHP > Edit PHP Config.
- Select the latest version (e.g., PHP 8.3 or 8.4).
- Increase the
memory_limitto 512M andupload_max_filesizeto 100M. This ensures your server doesn’t “choke” during heavy tasks or large file uploads.
Conclusion: Your High-Performance Server is Ready
By following these steps to install CyberPanel on Contabo, you have successfully bypassed expensive monthly licensing fees while gaining access to the world’s fastest web server technology. In 2026, the combination of Contabo’s generous NVMe resources and CyberPanel’s OpenLiteSpeed engine creates a hosting environment that can outperform managed providers costing ten times as much.
You now have a server that is:
- Fast: Optimized with server-level LSCache.
- Secure: Protected by Let’s Encrypt SSL and a hardened firewall.
- Scalable: Ready to host one or one hundred websites with ease.
The journey doesn’t end here, make it a habit to log into your dashboard weekly to run updates and monitor your resource usage. Your path to hosting independence starts now.
This is how you can install Cyberpanel on Contabo and turn your website. If you have any questions, comment below or send us an email via our contact page, and I will be happy to help.