When it comes to self-hosting, many people are intimidated by the complexity of managing a mail server. This is where Mail-in-a-Box (MiaB) changes the game. If your goal is to create SMTP with Mailinabox, you are choosing a path that prioritizes ease of use without sacrificing power.
What is Mail-in-a-Box and Why Use It in 2026?
Mail-in-a-Box is an open-source complete solution designed to turn a fresh Ubuntu server into a fully functional mail server in minutes. In 2026, Mail-in-a-Box remains a top choice for individuals and small businesses who want to move away from the restrictive and expensive pricing models of SaaS providers like Google Workspace, Microsoft 365, getresponse, mailchimp etc
Now, Let’s see how to create SMTP with Mailinabox and send unlimited emails. In our previous post, I talked about how you can build an SMTP server and send unlimited emails using postal Mail transfer agent. There are numerous ways to build an SMTP server. There is postal, powerMTA, postfix, exim, and a host of others. Though these mail transfer agents vary from one another in terms of speed, reliability, processing power, and a lot of other features.
Mail-in-a-Box includes and configures Postfix as a core component of its complete email solution. it provides an all-in-one solution by including an SMTP server and other essential components. Mail-in-a-Box is designed for ease of use, making it accessible for individuals looking to manage their own email infrastructure.
Why it’s the Easiest Way to Create SMTP with Mailinabox for Beginners
Unlike other mail transfer agents (like Postal or Mailcow) which require you to understand Docker or manually configure database links, Mail-in-a-Box handles the hard work for you.
- No Hidden Configs: It uses a “best-practices” configuration by default. Unlike postal you don’t have to guess how to set up SPF or DKIM; the box does it for you.
- Automated Security: It includes built-in spam filtering (SpamAssassin), greylisting, and a firewall (UFW) that are pre-configured the moment you finish the installation.
The Unlimited Sending Advantage: No Per-Email Fees
When you use a service like mailgun, SendGrid, your bill grows every time you grow your list. When you create SMTP with Mailinabox, the only limit is the physical power of your VPS.
- Unlimited Accounts: Create as many email addresses as you want across multiple domains.
- Unlimited Sending: You aren’t charged for “monthly quotas.” Whether you send 100 or 100,000 emails, your cost remains the flat monthly fee of your VPS provider.
- Data Sovereignty: In 2026, privacy is more important than ever. With MiaB, your emails aren’t being scanned by big tech for advertising data—they are stored on your hardware under your control.
Prerequisites: What You Need Before You Start
Before you begin the installation, you must ensure your infrastructure meets these three critical criteria. If you skip these, your installation will likely fail, or worse, your emails will never reach the inbox.
The Mandatory OS: Ubuntu 22.04 LTS
While Ubuntu 24.04 and 25.04 are available in 2026, Mail-in-a-Box specifically requires Ubuntu 22.04 LTS (64-bit). The installer is hard-coded to work with the specific package versions found in the “Jammy Jellyfish” repository. Do not attempt to install this on a “Container” (like OpenVZ); you must use a KVM-based VPS to ensure the installer can modify the system kernel and networking as needed.
Hardware Specs: Why 2GB RAM is the “Sweet Spot”
Technically, Mail-in-a-box can run on 1GB of RAM, but in 2026, that is a recipe for disaster. Between the ClamAV antivirus scanner, the SpamAssassin filter, and the Nextcloud instance, a 1GB server will frequently “swap” data to the disk, causing slow email delivery.
- CPU: 1 Core is sufficient, but 2 Cores will make the webmail and admin panel much snappier.
- RAM: 2GB is highly recommended. If you plan on sending high-volume bulk mail, 4GB will provide the stability needed to prevent the mail queue from clogging.
- Storage: 30GB+ NVMe SSD. Remember, every email you send and receive takes up space.
The “Port 25” Factor: Choosing Your VPS Provider
This is the most important step to create SMTP with Mailinabox that actually works. Many popular hosts like DigitalOcean and Vultr block Port 25 by default to prevent spam. If Port 25 is blocked, you can receive emails, but you can never send them.
For 2026, here are the top recommended providers that still allow SMTP traffic:
- Contabo: Offers high-RAM VPS plans at low cost. Port 25 is usually open, though they have a “25 emails per minute” limit for new accounts to protect their IP reputation.
- RackNerd: Highly recommended for email marketers. Their IPs are generally clean, and Port 25 is often open by default.
- isHosting / Colonel Server: These providers specialize in “Email VPS” and offer unrestricted outbound sending on their medium-tier plans.
- Hostwinds: Hostwinds generally leaves Port 25 open for their VPS instances by default. However, they are very proactive about protecting their IP reputation.
- VPSbg: VPSbg provides great vps architecture at quiet affordable price. The great thing about vpsbg is that the have clean IPs with great reputation. Sometime they do put restrictions on new accounts. If your account is one of the cases, you can contact them to unblock it for you if you are really a genuine sender.
Pro-Tip: Always check your IP address on a blacklist (like Spamhaus) and MXblacklist before you start the installation. If the IP is already dirty, ask your provider for a fresh one immediately.
Mail-in-a-box Setup: Step-by-Step Guide
Like I we said before, we need just two things:
- A domain name, and you can get one from Namecheap, GoDaddy, or any domain registrar of your choice.
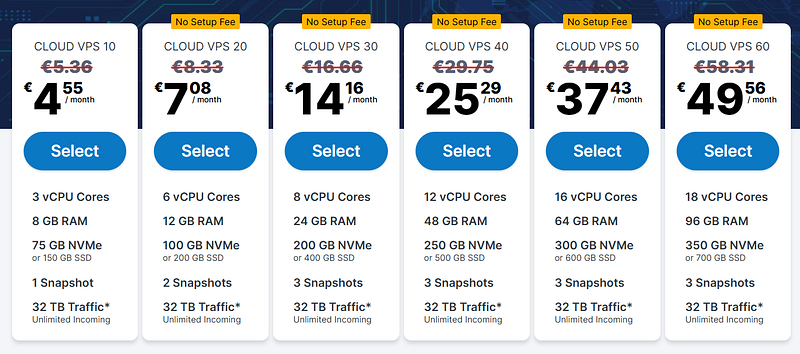
- A VPS server with port 25 open. I recommend you go with any of the above ones I listed or any one of your choice. For the sake of this guide i will be going with contabo but the process is almost the same for all providers.
Let’s set up a virtual private server (VPS) on your preferred VPS or cloud provider.
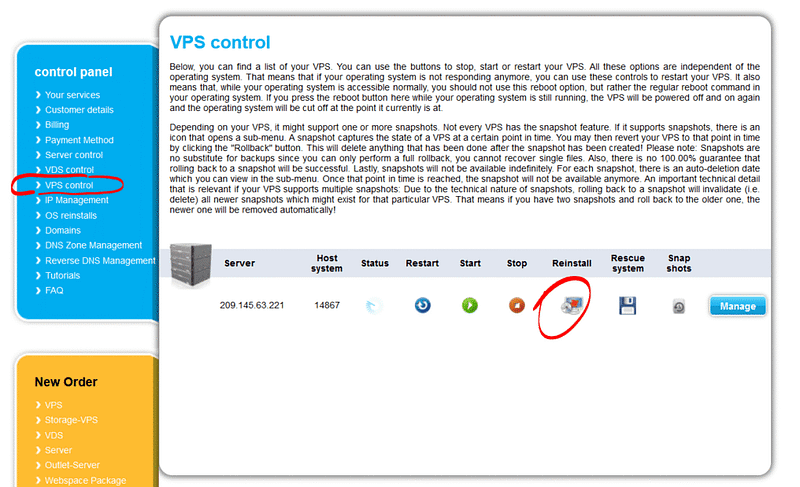
Configure Ubuntu 22.04 OS and place your order. In the event you have another OS installed, such as CentOS, follow the picture below to reinstall Ubuntu 22.04 on your VPS.
Add a Custom Nameservers
Now, we need to add a custom nameserver. For this guide, I am using Namecheap, but the process is the same for GoDaddy or any domain registrar you may be using. Follow the step we will show below and you will be well up to do it in any domain registrar.
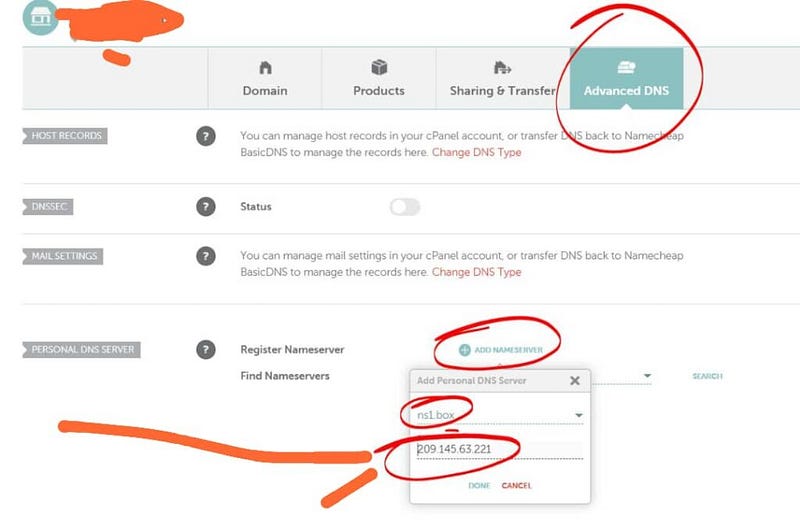
Now, click on add nameservers to add a custom nameservers. Change it to the following:
ns1.box.hostnamy.com
ns2.box.hostnamy.com
Note: By doing this, Mail-in-a-Box will handle all your DNS records (SPF, DKIM, etc.) for you automatically.
Accessing your VPS server through SSH
You need an SSH client to connect to your server. For mac users, you can connect using your mac terminal. For window users, you can download the putty (for window users only) or termius (Compatible with all operating systems). Termius is the best in my experience because, you can use it to manage both your file system and ssh all in one place.
Irrespective of the SSH client you are using, run the following command on your terminal:
ssh root@YOUR_SERVER_IP
Make sure to replace the ‘YOUR_SERVER_IP’ part to your VPS IP. If you are prompted to input your server password, input it, it may not be visible, but just type it. Hit on enter and you will be in your server command line like this:

Then for those of you using termius click on add host, add your server ip address and password. See the screenshot below: Click on connect and you will be in your command line.

How to Create SMTP with Mailinabox (The Installation)
The beauty of Mail-in-a-Box is that it automates the installation of dozens of components—Postfix, Dovecot, SpamAssassin, and more—into a single cohesive unit.
The One-Line Command That Starts the Magic
To begin, you will need to log into your Ubuntu 22.04 server via SSH (using a tool like PuTTY or your terminal). Once logged in as the root user, copy and paste the following command:
sudo -i
Test whether port 25 is open on your VPS
apt install telnet -y
telnet smtp.gmail.com 25
You will see a Connected success message. If you didn’t see the success message, that means port 25 is blocked on your server and you have to email your hosting provider for unblocking or buy vps from companies that have port 25 open.
Next, set the hostname with the following command,
hostnamectl set-hostname box.hostnamy.com
Replace hostnamy.com with your domain name. Please leave the box as it is. After that, update the server with following command:
apt update && apt upgrade -y
Now run the following command:
curl -s https://mailinabox.email/setup.sh | sudo bash
This script will begin downloading the necessary packages. It may take a few minutes depending on your server’s connection speed and internet speed.
Walking Through the Setup Wizard
After the initial downloads, a blue text-based setup wizard will appear. This is where you finalize the identity of your mail server.
- Primary Administrator Email: The installer will ask for an email address. This will be your primary account for the box (e.g.,
admin@yourdomain.comnot not yourchoice@box.domain.com). It will also be your username for the admin dashboard. - Hostname Confirmation: It will suggest a hostname (usually
box.yourdomain.com). If you followed Step 1 correctly, simply press Enter to confirm. - Timezone: You will be prompted to select your geographic location. This ensures that your email logs and timestamps are accurate.
Security First: Setting Your Administrative Password
The final and most important step of the wizard is creating a password.
- This password is for your primary email account AND the admin panel.
- Requirement: In 2026, with the rise of automated brute-force attacks, you must use a strong password (16+ characters, including symbols and numbers).
Once you enter the password, the script will spend 5–10 minutes configuring the firewall (UFW), setting up the database, and generating security keys.
Finalizing the Installation
When the process finishes, you will see a success message in your terminal. It will provide two critical URLs:
- Admin Interface:
https://box.yourdomain.com/admin - Webmail:
https://box.yourdomain.com/mail
Note: Don’t worry if you see a “Privacy Warning” or “Self-Signed Certificate” error when you first visit these links. This happens because the SSL certificates haven’t been issued yet.
Accessing the Admin Dashboard and Adding Users
In 2026, Mail-in-a-Box remains one of the few self-hosted solutions that provides a clean, “no-code” dashboard to manage your entire email infrastructure.
Logging into the Mail-in-a-Box Control Panel
Open your web browser and navigate to the admin URL provided at the end of your installation: https://box.yourdomain.com/admin
- Username: The email address you entered during the setup (e.g.,
admin@yourdomain.com). - Password: The strong password you created during the installation.
Note on Security Warnings: On your first login, your browser will likely show a “Connection is not private” warning. This is because the box is currently using a “self-signed” certificate. Click Advanced and Proceed; we will fix this in just a moment.
Navigating the System Status Checks
The “System Status Checks” page is the heart of Mail-in-a-Box. It runs a comprehensive scan of your server every few minutes to ensure everything is perfect.
- The Goal: You want to see as many green items as possible.
- Common Red Items: You will likely see red warnings for SSL certificates and DNS records initially.
- SSL Fix: Navigate to System > TLS (SSL) Certificates in the menu. Click the button to “Provision” certificates from Let’s Encrypt. Once finished, that “Privacy Warning” in your browser will disappear forever.
Creating Your First SMTP User
To send emails through an app or website, you need a dedicated email account.
- Go to Mail > Users in the top menu.
- Under Add a new mail account, enter the desired email (e.g.,
sender@yourdomain.com). - Assign a strong password and click Add User.
This account is now your “SMTP User.” You can use these credentials in WordPress, Mailwizz, or any other application to start sending.
Managing Multiple Domains
One of the best reasons to create SMTP with Mailinabox is its multi-domain support. If you own brand-a.com and brand-b.com, you don’t need two servers. Simply add a new user with the second domain (e.g., hello@brand-b.com), and the box will automatically generate the necessary DNS instructions for that second domain.
Configuring DNS for Maximum Deliverability
Mail-in-a-Box is famous for its “System Status Checks” that tell you exactly which DNS records are missing. For 2026, there are four key pillars you must configure to ensure your “unlimited” emails don’t end up in the spam folder.
1. The Power of SPF (Sender Policy Framework)
SPF is your “authorized sender” list. It tells receiving servers exactly which IP addresses are allowed to send email for your domain.
- The Record: Mail-in-a-Box generates this automatically. It usually looks like
v=spf1 mx ip4:123.45.67.89 -all. - Pro-Tip: The
-allat the end is a “Hard Fail.” In 2026, this is preferred over~allbecause it tells providers to strictly reject any mail that doesn’t come from your specific Mail-in-a-Box IP.
2. DKIM (DomainKeys Identified Mail)
DKIM adds a “digital signature” to every email you send. This proves that the content of the email hasn’t been tampered with while traveling across the internet.
- The Setup: MiaB generates a 2048-bit private key internally and signs your mail. It provides the matching public key in your admin dashboard under System > External DNS.
- Action: If you are using external nameservers (like Cloudflare), you must copy this long TXT record exactly as it appears.
3. DMARC (The Enforcement Policy)
DMARC is the most critical update for 2026. It tells the world what to do if an email fails SPF or DKIM.
- Monitoring Phase: Start with
v=DMARC1; p=none;. This allows you to “watch” your reports without blocking mail. - Enforcement Phase: Once you see that your legitimate emails are passing, change your record to
p=quarantineorp=reject. Major providers now prioritize senders who have a strict DMARC policy in place.
4. Setting up the PTR (Reverse DNS) Record
This is the “Secret Sauce” to high deliverability. A PTR record does the opposite of a standard DNS record: it maps your IP address back to your domain name.
- Why it matters: When your server connects to Gmail, Gmail looks at your IP and asks, “Who does this belong to?” If the answer is
box.yourdomain.com, you are trusted. If the answer is a generic provider string likevps-123-cloud.host.com, you will likely be flagged as a bot. - How to fix: You cannot set this in Mail-in-a-Box. You must go to your VPS provider’s control panel (Contabo, RackNerd, etc.) and look for the “Reverse DNS” or “PTR” setting. Set it to
box.yourdomain.com.
External DNS vs. MiaB Nameservers
Mail-in-a-Box prefers to be your Nameserver (ns1 and ns2). If you let it do this, all the records above are managed for you automatically.
Recommendation: If you are a beginner, let Mail-in-a-Box handle your DNS. It removes 90% of the technical headaches and ensures your “Green Lights” stay green
Sending Unlimited Emails – Best Practices for 2026
In 2026, the “Big Three” (Google, Yahoo, and Microsoft) use advanced AI to monitor sending patterns. Here is how to scale your volume without getting banned.
Why You Must “Warm Up” Your New SMTP Server
Even if your DNS is perfect, a brand-new IP address has zero “trust” in the eyes of Gmail. If you suddenly send 10,000 emails, you will be flagged as a compromised server.
- The 4-Week Warm-up Schedule:
- Week 1: Send 20–50 emails per day to your most engaged contacts (friends, coworkers). Ask them to reply!
- Week 2: Increase to 100–200 emails per day.
- Week 3: Move to 500 emails per day.
- Week 4: Gradually scale toward your target “Unlimited” volume.
- Consistency is Key: AI filters look for “spikes.” It is better to send 1,000 emails every day than 7,000 emails once a week.
Connecting Your SMTP to Third-Party Tools
Mail-in-a-Box provides the delivery engine, but you’ll likely use a frontend to manage your campaigns.
- WordPress: Use the “WP Mail SMTP” plugin. Choose the “Other SMTP” option and enter your Mail-in-a-Box details (Host:
box.yourdomain.com, Port:587, Encryption:STARTTLS). - Marketing Automation: You can connect your box to tools like Mailwizz, Mautic, or Sendy. In 2026, ensure these tools are configured to handle Webhooks so that if an email bounces, Mail-in-a-Box can tell your software to stop emailing that person immediately.
Monitoring Your IP Reputation and Bounce Rates
To maintain “Unlimited” status, you must keep your Spam Complaint Rate below 0.1% (1 complaint per 1,000 emails).
- Google Postmaster Tools: Register your domain here. It is the only way to see your “Domain Reputation” directly from Google’s perspective.
- Cisco Talos: Check your IP here weekly to ensure you haven’t been added to any global blacklists.
- One-Click Unsubscribe: As of 2026, Google and Yahoo require a “List-Unsubscribe” header. Mail-in-a-Box handles the technical side, but make sure your email content always has a clear, working unsubscribe link.
List Hygiene: The “Secret” to Unlimited Sending
The quickest way to “burn” your server is by sending to dead or fake email addresses (hard bounces).
- Verify Your Lists: Use a service like NeverBounce or ZeroBounce before importing a list into your SMTP.
- Prune Inactive Users: If a subscriber hasn’t opened an email in 6 months, remove them. Sending to “ghost” accounts hurts your engagement score.
Conclusion: Is Mail-in-a-Box Right for Your Business?
By now, you have seen that it is entirely possible to create SMTP with Mailinabox and move away from the “per-email” pricing models of big tech. In 2026, this remains the most straightforward way for a non-technical user to own their entire email infrastructure.
The Clear Recommendation
If you are a small business owner, a freelancer, or a developer who needs a reliable, low-maintenance mail server, Mail-in-a-Box is your best choice. It strikes a perfect balance between professional deliverability features (SPF, DKIM, DMARC) and extreme ease of installation.
Who Should Buy (Self-Host) This?
The “Unlimited” Seekers: If you send high volumes of transactional or marketing emails and are tired of $200+/month SendGrid or Mailgun bills.
Privacy Advocates: If you want your data stored on your own encrypted disk rather than on a third-party server.
Beginners: If you want a “pro-level” mail server but aren’t comfortable managing Docker containers or complex Linux configurations.
Who Should Skip It?
- Enterprise-Scale Sending: If you are sending millions of emails per hour, you will need a more modular system like Postal or a dedicated PowerMTA setup.
- Ubuntu Purists: If you absolutely insist on using a different OS like Debian or CentOS, Mail-in-a-Box will not work for you; look into Mailcow or iRedMail instead.
Final Thoughts on the “Unlimited” Promise
While the software allows you to send unlimited emails, remember that your reputation is your currency. Mail-in-a-Box gives you the engine, but you are the driver. Follow the warm-up protocols, keep your lists clean, and monitor your “Green Lights” in the admin dashboard.
With a $10/month VPS and Mail-in-a-Box, you can effectively run a world-class email operation that rivals the biggest players in the industry.
As you can see, to create SMTP with Mailinabox is very straightforward and easy. You just have to run a few commands and you are good to go.
Use platforms like mail-tester to test your sending score before sending.
Aside this post which have thought you create SMTP with Mailinabox we also have other post that shows you how to build an smtp server with postal to send unlimited email. You can also check it out if you want.
bAlso if you want to learn and take your email sending seriously, we have a course on udemy that teaches you have to a cold email outreach system with postal and send unlimited emails. We put in alot of efforts to create this course and I believe it will be a real game changer for your business.
This is it on how to create SMTP with Mailinabox and send unlimited emails from your own server. If you have any question please don’t forget to ask or comment below. Thanks for reading.