Today, AI is everywhere, and if you haven’t integrated AI into your business yet, I can confidently tell you that you are missing a lot of traction, potential sales, and conversions in your business. In this article, I will guide you on how to create AI Tools With WordPress and maintain an unbeatable online presence.
Roughly 14 months ago, from the date of writing this article, I noticed that sales, conversions, and traffic continued to decline. Initially, I didn’t pay attention since I was still seeing enough sales to keep my business and day-to-day life up and running. At a point, I couldn’t continue to not see the obvious. The revenue continued in the downward spiral till I hit my unbelievable lowest revenue.
Just as anyone would have done, I started looking for a solution. I found out that most of my site visitors now rely on AI chatbots like ChatGPT, Google Gemini, Perplexity, grok, Claude, etc, to get most of the information they are getting from my site. What do I do?? I started looking for how to integrate AI into my business. The truth about these new technologies is that AI and Web 3 won’t replace those who learn how to use them, but if you are afraid of them, they will impact your business negatively.
Without much bluff, let’s see how to create AI Tools With WordPress and tap into the growing AI trend. Here is the outline that is going to be our outline:
- Basic Requirements
- Tool ideas to integrate into WordPress
- WordPress Basic Setup
- Understanding too Structure.
- Generating Hooks with AI
- Building a Backend with WordPress
- Generate the UI
- Connect the UI with the snippet
- Publish on WordPress
- Update the UI
- Restrict Tool For Authenticated Users
- Add The Credit System
Basic Requirements to Create AI Tools With WordPress
I would like to say… if you already have knowledge of the basic requirements to create AI Tools with WordPress, you can skip this part. But if not, pls don’t skip as you need to understand these foundational elements. You will need a domain, reliable hosting, access to AI APIs, and useful tools for building your site. Here’s a breakdown of the key requirements:
Domain name
Your domain name is your online address, and it’s crucial for branding and credibility. For creating AI tools with WordPress, I recommend registering your domain with Namecheap, known for affordable and reliable domain registration services.
Web Hosting
One of the major mistakes that people make when building AI tools with WordPress is that they host their websites using low-cost hosting providers. Most of the time, low-cost hosting means low and inefficient resources are needed to run your AI-powered tools optimally.
I also understand there are people who understand this reality, but there are not enough resources to go for a hosting provider with great resources, as they need to run the tool. My goal is to help you have, first, a very good and high-performing hosting environment at an affordable cost to run all your tools, even if you are building multiple AI tools, without incurring more costs.
More Resources to understand the Concept of Web Hosting
Here at hostnamy, we have written some few articles that will help you undestand web hosting better. You can check them out below:
- How to Install Cyberpanel on Contabo.
- How to Install WordPress on Cyberpanel.
- How to install WordPress on Ubuntu (No cPanel)
Web Hosting Coupons and Discounts
Before we go into How To Create AI Tools With WordPress properly, It is very important I point out that running AI tools on wordpress requires great server resources to maximize performance and overall user experience.
Here are our Carefully chosen web Hosting providers with the discounts codes codes they have provided for us to help you to Create AI Tools With WordPress seamlessly. Note: We prefer you go with VPS or cloud hosting than traditional shared hosting will not give you the required resource allocation to Create glitch-free AI Tools With WordPress:
In this tutorial, we are going to go with contabo because they offer very high server resources at the cheapest price.

I recommend you go with the $14/month plan on contabo, though you can use a lower specification and scale later. With this, you are getting 8 CPU and 24 GB RAM, which is enough to run your site, as your tool site needs speed and performance for a good customer experience.
Configure Plesk on your VPS
The next thing you have to do is to configure Plesk on your chosen VPS plan. On APPS & PANELS, select Plesk + Linux. This will increase the total bill to like $28/month, but this is really going to make things very easy for you, and you will have the flexibility of hosting unlimited WordPress sites. You can always go with a lower contabo plan and scale up later, or as your traffic grows.

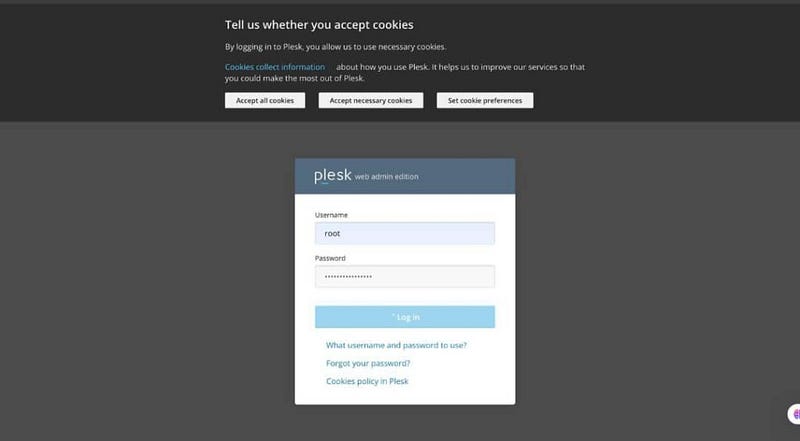
Click on next and checkout, and contabo will send you your Plesk login credentials to your email, like this https://45.32.167.178:8443/login. Log in with your username which by default is ‘root’ on contabo, and the password you used when signing up.
NOTE: Ensure to map your domain to your VPS IP if you want to access your Plesk panel using your domain or sub-domain.
Then click on add domain to add your domain name, and the good thing is that you can add unlimited domains.
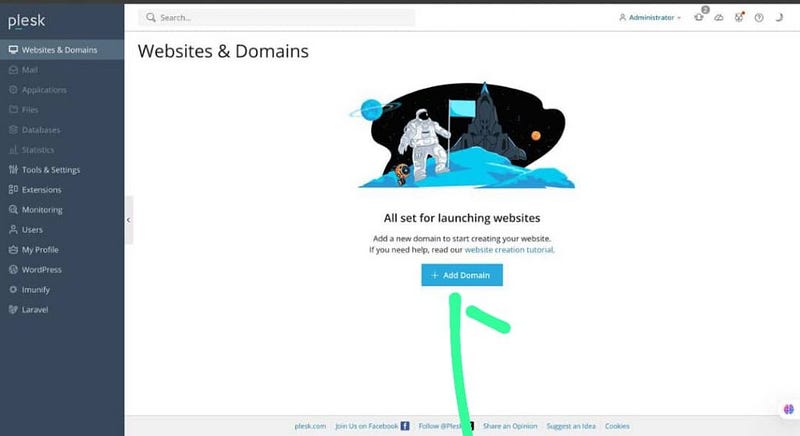
Add a new WordPress site and install WordPress on your domain. Ensure you map your domain name to your VPS IP address before performing this action. If you don’t, the WordPress installation may not go through. To add and host unlimited tools and domains, go to Websites & Domains and add domains of your choice.
Configure Plesk on shared hosting
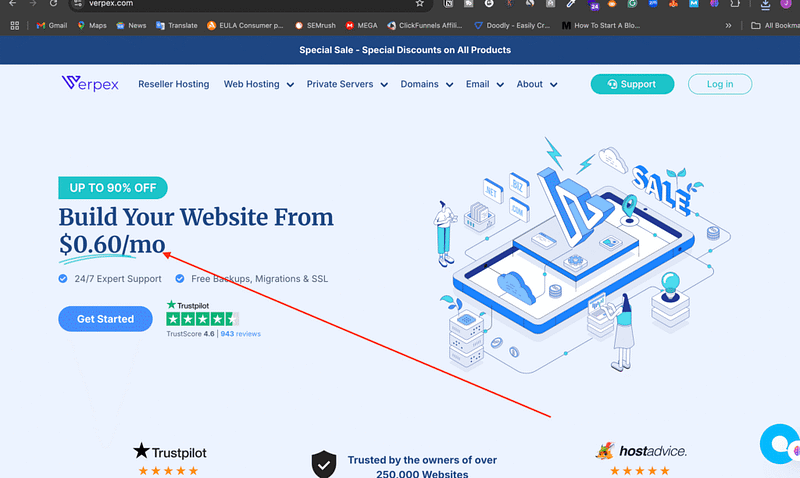
If you want to go with shared hosting, you can check out Verpex, as they also have great server resources at a relatively affordable price.
Like I said before, choosing the right hosting provider ensures your WordPress site runs smoothly as you develop these new AI capabilities. To make things easy, I have secured a hosting coupon for Verpex, offering affordable plans with sufficient resources for AI integrations and backups. You can test Verpex out for as low as $0.6 for your first month.
You are not obliged to use Verpex, you can use any hosting of your choice, but ensure that the hosting supports PHP 7.4 or higher and has good bandwidth to handle AI-related API requests and traffic. Just in case you don’t have a budget for now, you can install WordPress locally by using LocalWP or DevKinsta.
Application Programming Interface ( APIs )
To create AI tools with WordPress, you’ll need access to any of the below powerful APIs. Note that any of them can serve, and the process is pretty much the same. Though I will be using OpenAI API for this:
- OpenAI (e.g., GPT models) for natural language processing and automation.
- Google Gemini (soon to be rolled out) for advanced AI functionalities.
- Perplexity and Claude by Anthropic for conversational AI and contextual understanding.
These APIs provide the backbone for your AI tools, enabling your WordPress site to power AI-intelligent features.
Page Builder Plugin
For designing your AI tool interfaces, I recommend using Elementor, a popular drag-and-drop page builder that simplifies creating stunning, user-friendly layouts without extensive coding. You can use the free version for now, but later on you may need to get the paid version if you need more AI Capabilities.
Tool ideas to integrate with WordPress
Here are some tool ideas to be integrated into your WordPress website
- blog title generator
- Keyword Analyzer
- Keyword Research Tool
- Image Generator Tool
- AI Hook Generator
To build tools on WordPress we need one major plugin. That is the WPCode snippet. Ensure you go to the WordPress repository and install the WPCode snippet.
Understanding the tool structure
The tool structure is very simple; we have the frontend, the backend, and the API.
- Frontend: You can use HTML and CSS or Elementor to create the frontend.
- Backend: This is where the code snippet comes in handy. The code snippet is gonna serve as our backend.
- API: This generates our AI-driven content.
Now, you have to pay attention, because once you understand this, you can build any tool of your choice. In building a tool on WordPress we have 3 parts: the frontend, the backend, and the API. The frontend is simply the UI where you can type your queries or requests. Let’s say you have a blog title generator on your site; the frontend is the interface where you type your queries.
Once you click on Generate, your requests will be sent to the backend, which in turn sends your request to openai API or any API you are working with. The API generates the request and sends it to the backend, which sends it to the frontend that you now see. So this is the basic structure of any AI-powered WordPress tool. Let’s see the next step.
Getting your OpenAI API Key:
To get your OpenAI API key, go to platform.openai.com, sign up. Click on the dashboard and then API keys. Create your API key and save it in a safe place.
Step 1: Add The API Call Function
This is where we add a PHP function using the WPCode plugin that will enable our tool to communicate with the OpenAI API.
What is the Purpose of the WPCode Plugin?
WPCode is a WordPress plugin that gives us the flexibility of easily adding PHP functions and code to WordPress. It saves us the headache of modifying your theme’s functions.php file to add custom code.
Installing and Activating WPCode Plugin
- From your WordPress dashboard, go to ‘Plugins > Add New’
- Search ‘WPCode‘ in the search bar in the plugin repository.
- Click on ‘Install Now’, wait for it to install, then finally ‘Activate’.

Adding the OpenAI API Call
Once WPCODE is activated, follow the following steps to add your custom PHP code snippet and initiate an API call:
- On the WordPress dashboard, navigate to ‘Code Snippets> Add New’.
- Give your new code snippet any name of your choice, like “MY FIRST API Call”.
- Choose the snippet Type to be PHP
- In the Code field, you’ll enter your PHP code. Below is a sample code structure you can follow:
function openai_generate_text() {
    // Get the topic from the AJAX request
    $prompt = $_POST['prompt'];
    // OpenAI API URL and key
    $api_url = 'https://api.openai.com/v1/chat/completions';
    $api_key = 'sk-XXX';  // Replace with your actual OpenAI API key
    // Headers for the OpenAI API
    $headers = [
        'Content-Type' => 'application/json',
        'Authorization' => 'Bearer ' . $api_key
    ];
    // Body for the OpenAI API
    $body = [
        'model' => 'gpt-3.5-turbo',
        'messages' => [['role' => 'user', 'content' => $prompt]],
        'temperature' => 0.7
    ];
    // Args for the WordPress HTTP API
    $args = [
        'method' => 'POST',
        'headers' => $headers,
        'body' => json_encode($body),
        'timeout' => 120
    ];
    // Send the request
    $response = wp_remote_request($api_url, $args);
    // Handle the response
    if (is_wp_error($response)) {
        $error_message = $response->get_error_message();
        wp_send_json_error("Something went wrong: $error_message");
    } else {
        $body = wp_remote_retrieve_body($response);
        $data = json_decode($body, true);
        if (json_last_error() !== JSON_ERROR_NONE) {
            wp_send_json_error('Invalid JSON in API response');
        } elseif (!isset($data['choices'])) {
            wp_send_json_error('API request failed. Response: ' . $body);
        } else {
            wp_send_json_success($data);
        }
    }
    // Always die in functions echoing AJAX content
   wp_die();
}
add_action('wp_ajax_openai_generate_text', 'openai_generate_text');
add_action('wp_ajax_nopriv_openai_generate_text', 'openai_generate_text');
openai_generate_text, in the code above defines a PHP executable function which will be executed once a request is made to WordPress using the action openai_generate_text.
This function communicates with OpenAI’s API to generate a text based on a prompt provided by the user.
The function first retrieves the user-provided prompt from the POST request:
$prompt = $_POST['prompt'];
The last two lines of the code hook the function to the wp_ajax_openai_generate_text and wp_ajax_nopriv_openai_generate_text actions so that they will be executed when a request with the action openai_generate_text is made to WordPress.
Publishing your Code.
Ensure to set this script to run everywhere so that it can run in all environments, and click on publish.

Step 2: Create The Tool Page
The next step is to create the Tool page.
Like I said earlier, we’ll be using Elementor, a popular WordPress page builder, to create and design our tool page.
Note: You can use any builder you want. What is important is the ability to add custom HTML code to the page.
Installing and Activating Elementor
- Go to your ‘Plugins repository again > Add New’.
- Search and install the ‘Elementor‘ plugin and activate it.
Creating the tool Page with Elementor
- On your WordPress menu, click on ‘Pages > Add New’ from your WordPress dashboard.
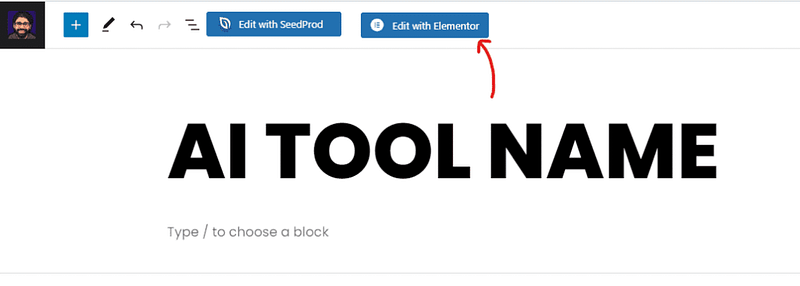
- Enter your desired page name or title, such as “My AI Tool”.
- Click on ‘Edit with Elementor‘ to start designing your new page.
Adding Custom HTML in Elementor
To add custom HTML in Elementor, drag and drop the HTML Code widget into your new, fresh page. Follow these steps:
- On the Elementor editor page, you’ll see a sidebar with several icons on the left. Click on the one that looks like a grid or matrix.
- This will open up a list of widgets that you can use. Look for the ‘HTML’ widget
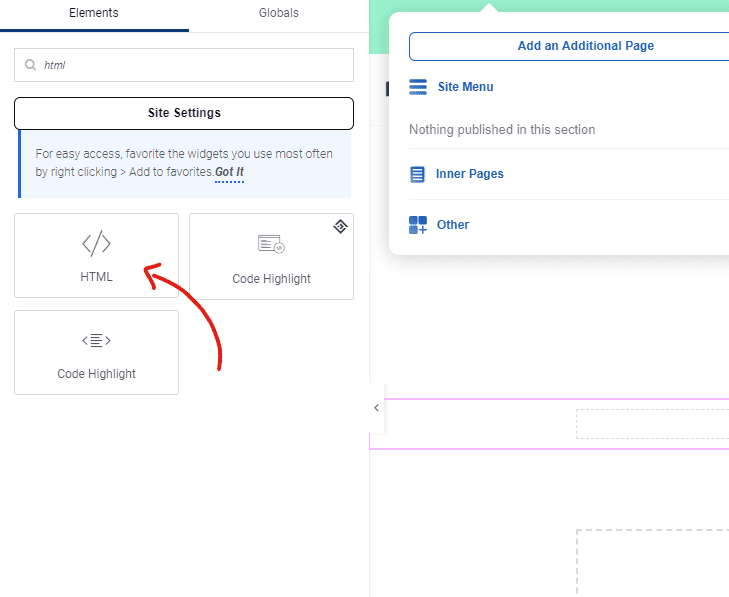
Here, you can paste your custom HTML code for your AI tool. In our case, it will include code for an input field, a button, and a text area for output results.
See the Sample below:
<div>
    <input type="text" id="userInput" placeholder="Type something here...">
    <button id="submitButton">Submit</button>
    <textarea id="resultArea"></textarea>
</div>
To make things easy for you, I created the full HTML, JS, and CSS Code so that you can copy and paste it directly. Feel free to use your own code if you have.
<div id="text-generation-tool">
    <input type="text" id="topic" placeholder="Your Topic...">
    <button id="generate-button">Generate Story!</button>
    <div id="result-container" style="display: none;">
        <div class="result-wrapper">
            <div class="result-content">
                <textarea id="result" readonly></textarea>
            </div>
            <div class="copy-button-container">
                <button id="copy-button">Copy</button>
            </div>
        </div>
    </div>
    <div id="loading" class="loader" style="display: none;"></div>
</div>
<style>
    /* Basic styles for the text generation tool */
    #text-generation-tool {
        width: 100%;
        max-width: 600px;
        margin: 0 auto;
        font-family: Arial, sans-serif;
    }
    #topic {
        width: 100%;
        padding: 15px;
        margin-bottom: 20px;
        font-size: 16px;
        border-radius: 5px;
        border: 1px solid #ddd;
    }
    #generate-button {
        display: block;
        width: 100%;
        padding: 15px;
        margin-bottom: 20px;
        font-size: 16px;
        border: none;
        border-radius: 5px;
        color: #fff;
        background-color: #3498db;
        cursor: pointer;
        transition: background-color 0.3s ease;
    }
    #generate-button:hover {
        background-color: #2980b9;
    }
    #result-container {
        display: none;
        margin-bottom: 20px;
    }
    .result-wrapper {
        position: relative;
        overflow: hidden;
    }
    .result-content {
        display: flex;
    }
    #result {
        flex: 1;
        height: 400px;
        padding: 15px;
        font-size: 16px;
        border-radius: 5px;
        border: 1px solid #ddd;
        background-color: #f9f9f9;
    }
    .copy-button-container {
        margin-top: 10px;
        text-align: right;
    }
    #copy-button {
        padding: 8px 12px;
        font-size: 14px;
        border: none;
        border-radius: 5px;
        color: #fff;
        background-color: #3498db;
        cursor: pointer;
        transition: background-color 0.3s ease;
    }
    #copy-button:hover {
        background-color: #2980b9;
    }
    /* CSS for the loader */
    .loader {
        display: block;
        margin: 50px auto;
        border: 16px solid #f3f3f3; /* Light grey */
        border-top: 16px solid #3498db; /* Blue */
        border-radius: 50%;
        width: 50px;
        height: 50px;
        animation: spin 1s linear infinite;
    }
    @keyframes spin {
        0% { transform: rotate(0deg); }
        100% { transform: rotate(360deg); }
    }
</style>
I generated this code with ChatGPT in less than 3 minutes, and you can do the same if you want.
You can use this code as a baseline for any tool you want to create in the future. For example, if you want to change the placeholder text in the input field, adjust this line:
<input type="text" id="topic" placeholder="Your Topic...">
You can even input this code into ChatGPT and ask it to make modifications for you or add any feature of your choice, and it will output it for you.
Save Your Page!
Once you’ve pasted your code, click ‘Update’ to save your changes. Now you are all set.
Step 3: Connect The Page With The API Function
Now that we have our API function and our tool page set up, the next step is to connect them. This is where the JavaScript (JS) code comes in handy.
What does this JavaScript code do?
This JS code sets up an event listener on the ‘Generate Story!’ button so that when the button is clicked, it collects the topic selected by the user and sends it to our OpenAI API function using AJAX.
While the story is being generated, it shows a loading spinner. Once the story is returned, it hides the loading spinner and displays it in a text area in the result.
If there’s an error at any point, it shows an error message in the result text area.
The code also sets up an event listener on the ‘Copy’ button so that when clicked, it copies the generated story to the clipboard.
Adding the JavaScript Code
Here is the JavaScript code you need to add:
What you should focus on here is the prompt:
var prompt = "Generate a 3 sentence story about " + topic;
Here, I used a very simple prompt to help you understand the concept.
In your case, and based on your AI Tool Logic, you will add your custom prompt; for example, for instance, we are creating a Domain Name Generator Tool. You would use a prompt like this:
Generate a list of 10 domain name ideas for a website about [topic], and provide a brief explanation for each suggestion.
You can be more professional; here’s one of the sample prompts that Generates Domain Names Using AI:
Please generate 10 original and creative domain names specifically tailored for the [niche] niche, focusing on its main concepts and target audience.
Your response should prioritize domain names that effectively capture the attention of the [niche] audience and represent its key themes. For each domain name, provide a brief explanation (1-2 sentences)highlighting its relevance to the niche. Ensure that each domain name meets the following criteria:
1. Brand Relevance: Maintain a strong connection with the niche and its central concepts.
2. Memorable: Design the domain names to be captivating, easy to remember, and with familiar spellings.
3. Concise: Keep each domain name between 6-14 characters for ease of typing and recall.
4. Simplicity: Avoid using hyphens and numbers for a cleaner appearance.
5. Keyword Incorporation: Utilize relevant niche keywords for improved SEO, if possible.
6. Pronunciation: Ensure that each domain name is easily understandable when spoken or “radio-friendly.”
7. Domain Extensions: Prioritize .com, .net, .org, and .ai extensions when applicable.
8. Legality: Refrain from infringing on existing trademarks or brands.
Your response should exhibit flexibility and creativity while maintaining a focused approach on the [niche] niche, providing a solid foundation for building a brand within that market.
[niche]:
Add this JavaScript code to your tool page:
- Open up the Elementor editor for your tool page again.
- Drag and drop the ‘HTML’ widget onto your page the same way we did earlier.
- Paste the JavaScript code into the ‘HTML Code’ box.
- Click ‘Update’ to save your changes.
Or you can paste the code within the same HTML Code Box that we used before.
Your tool page is now connected to the OpenAI API function, and users should be able to use the tool based on their selected topic.
Optimizing Our Tool
Once we have our tool up and running, the process doesn’t stop there. It’s time for optimization. This can range from refining the UI (User Interface) to adding security measures like CAPTCHA.
Let’s say you want to change the UI of your tool. You can ask ChatGPT to help you with that by simply feeding it this prompt:
Hey, could you help me design a cleaner, more professional interface for my tool?
ChatGPT will provide suggestions or even an entirely new set of HTML/CSS codes tailored to your needs.
Adding a security measure like a captcha can also be a significant improvement, as it helps protect your tool from bots and ensures genuine user interactions. You can find numerous plugins and resources online to add a CAPTCHA to your WordPress site.
Lastly, remember that continuous optimization and updating your tool according to user feedback is the key to making your tool more user-friendly and successful. So, don’t forget to keep learning and optimizing your website to get the best out of your AI tools.